
AI Photo Editing Comparison 2025: Google Magic Editor vs Apple Clean Up vs Samsung Generative Edit — 7 Real-World Test Results
July 21, 2025
Apple HomePod 3 Rumors: Everything We Know About the 7-Inch Display and Apple Intelligence
July 21, 2025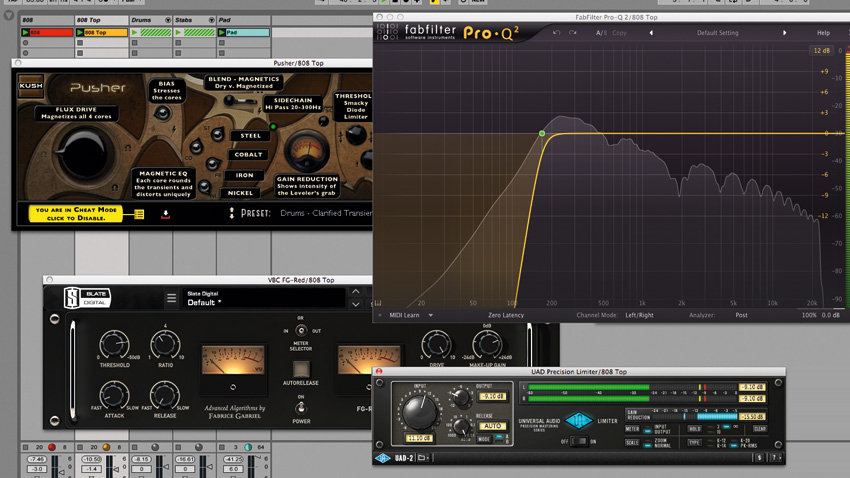
“The mix sounded perfect in the studio, but the bass completely disappeared on AirPods.” After 28 years in the audio industry, I’ve heard this complaint hundreds of times. Sub bass processing streaming platforms demand is fundamentally different from what worked in the CD era. With Spotify normalizing to -14 LUFS and Apple Music targeting -16 LUFS, simply making your bass “loud” is no longer the answer. The real question is whether your bass can be felt across every playback environment — from club PA systems to smartphone speakers.
In this guide, I’m breaking down the complete sub bass processing signal chain into seven actionable steps. From high-pass filtering and kick/bass separation to saturation for harmonic translation, multiband compression, mono bass treatment, LUFS-aware mastering, and codec-friendly optimization. Each step includes specific plugin settings and real-world values you can apply to your next session.
Step 1: High-Pass Filtering — Remove the Inaudible Garbage First
The lowest frequency humans can perceive is roughly 20Hz. Everything below that is inaudible but actively harmful — it eats headroom, causes speaker cones to move unnecessarily, and creates artifacts during codec encoding. Industry mastering engineers recommend a high-pass filter as the very first step in any sub bass processing chain.
In FabFilter Pro-Q 4, apply a 24dB/oct high-pass filter at 20-25Hz. The critical detail here is using Natural Phase mode. Linear Phase introduces pre-ringing artifacts in the low end, while Minimum Phase causes phase rotation. Natural Phase minimizes both drawbacks while maintaining transparent filtering.
For 808s and synth subs, cutting below 30Hz is usually sufficient. For acoustic bass guitar, you can safely go up to 40Hz. The principle is simple: remove energy you don’t need so the energy you do need has room to breathe.
Step 2: Kick and Bass Frequency Separation — The Core of Sub Bass Processing
When the kick drum and bass compete in the same frequency range, your low end turns into an undefined, muddy mess. FabFilter Pro-Q 4’s dynamic EQ bands are the most surgical tool for solving this conflict without compromising either element.
” alt=”Sub bass processing streaming setup with FabFilter Pro-Q 4 spectrum analyzer and dynamic EQ bands”/>
You have two main approaches. First, frequency domain splitting: carve the EQ so the kick owns the 50-80Hz punch zone while the bass owns the 80-120Hz sustain zone. Second, sidechain dynamic EQ: create a dynamic band on the bass track’s Pro-Q 4 at the kick’s fundamental frequency (say 60Hz), then set the kick as the sidechain input. The bass ducks 3-6dB at that frequency only when the kick hits.
This approach beats traditional sidechain compression because it only ducks the conflicting frequencies rather than the entire bass signal. The upper harmonics of your bass remain untouched while the sub-region collision is resolved with surgical precision.
Step 3: Sub Bass Saturation — Making Bass Audible on Tiny Speakers
Smartphone and laptop speakers physically cannot reproduce anything below 80Hz. So how do you make bass “felt” on these devices? The answer lies in harmonic generation through saturation.
According to MusicRadar’s bass saturation guide, saturation generates upper harmonics in the 150-500Hz range from the original sub frequencies. The human brain detects these harmonics and “assumes” the original fundamental frequency exists — this is the psychoacoustic bass enhancement principle. MusicTech’s tutorial on making subs cut through on small speakers confirms this approach: adding harmonic layers that trick the brain into perceiving sub bass even when the speakers can’t physically reproduce it.
Here’s the practical technique: use parallel saturation. Duplicate your bass track, apply a 100-150Hz high-pass filter to the duplicate, then drive it through FabFilter Saturn or Soundtoys Decapitator. Blend this processed signal back with the original. You preserve the clean sub energy from the original while adding harmonics that translate on small speakers.
A word of caution — excessive saturation actually removes real low-end energy rather than enhancing it. Keep the saturation amount focused on generating midrange harmonics, not destroying the sub fundamentals. A 20-30% blend of the saturated signal against the dry original is a safe starting point.
Step 4: Multiband Compression and Subharmonic Synthesis
Controlling the dynamic range of the sub region (20-80Hz) is essential for consistent low end. But using a full-band compressor to tame sub energy inevitably affects your midrange and high end too. Applying multiband compression exclusively to the sub region solves this without collateral damage.

” alt=”iZotope Ozone Low End Focus module for sub bass processing streaming optimization”/>
iZotope Ozone 11’s Low End Focus module is purpose-built for this task. It covers the 20-300Hz range with two distinct processing modes: Smooth mode works best for 808s and sustained synth bass, while Punchy mode handles kicks and percussive transients. The Mid-Side processing option lets you focus the low-end control on the center of the stereo field — exactly where sub bass should live.
When your source material lacks subharmonic content, Plugin Alliance’s bx_subsynth fills the gap. Unlike traditional bass enhancement tools that boost existing frequencies, bx_subsynth synthesizes entirely new frequencies one octave below the original signal. Its three independent bands provide granular control over subharmonic re-synthesis, and the Tight Punch feature adds a resonant sub-bass peak for extra impact.
Waves R-Bass and MaxxBass operate on a similar psychoacoustic principle, but bx_subsynth differentiates itself by generating actual new subharmonic frequencies rather than relying purely on harmonic perception. R-Bass excels at “perceived” bass enhancement through harmonic generation; bx_subsynth excels at adding real sub energy. Choose based on what your mix actually needs.
Step 5: Mono Bass — Everything Below 120Hz Goes to Center
Stereo information in the sub region is a phase cancellation hazard. On mono playback systems — Bluetooth speakers, club PA systems, many commercial installations — stereo sub bass can literally disappear. Professional engineers at Waves Audio unanimously recommend mono treatment below 120Hz as non-negotiable.
In FabFilter Pro-Q 4’s M/S mode, apply a high-pass filter to the Side channel at 120Hz. This renders the sub region completely mono while preserving the stereo image above 120Hz. If you’re using bx_subsynth, select the Mid-only processing mode so the subharmonic synthesis itself is generated in mono from the start.
One more tip: mono-check your mix throughout the entire mixing process, not just at the end. Hit the mono button on your DAW and listen to the sub region. If the bass weakens in mono, you have a phase issue that needs fixing before you move forward. After the fix, switching back to stereo should reveal no audible difference in the low end.
Step 6: LUFS-Aware Mastering — The Streaming Normalization Trap
This is where many engineers make costly mistakes. According to Spotify’s official documentation, Spotify measures loudness using the ITU 1770 standard and adjusts playback to -14 LUFS. Apple Music targets -16 LUFS. The audio itself isn’t processed or altered — only gain is adjusted during playback.
Here’s the trap: LUFS measurement reflects the human hearing sensitivity curve, which assigns less weight to sub frequencies. This means a sub-bass-heavy mix will sound perceptually quieter than a midrange-heavy mix at the same measured LUFS value. iZotope’s mastering guide explicitly warns about this phenomenon.
Two strategies to counter this. First, don’t fill your LUFS budget with sub energy alone. Use the harmonic saturation from Step 3 to ensure your bass has midrange presence, not just sub weight. Second, avoid over-compression. A master with preserved dynamic range sounds more impactful after normalization than a crushed one. Spotify’s own documentation confirms that over-compressed masters lose their dynamic punch after normalization.
” alt=”LUFS normalization targets for sub bass processing streaming platforms comparison”/>
Set your true peak limiter to -1 dBTP. This value, recommended in Plugin Alliance’s mastering guide, prevents intersample peaks that can occur during codec conversion on streaming platforms. Values of -0.3 dBTP or 0 dBTP may result in clipping after codec encoding.
Step 7: Codec-Friendly Optimization — What MP3 and AAC Actually Do to Your Bass
The final gate. When your master hits a streaming platform, it gets transcoded to OGG Vorbis (Spotify), AAC (Apple Music), or Opus. According to Sound On Sound’s analysis, MP3 handles low-frequency reproduction relatively well, while AAC excels at high frequencies but can introduce low-end artifacts at 128kbps. Both codecs struggle most with muddy energy below 100Hz.
The situation where codecs cause the most damage to your sub region is when there’s excessive muddy energy below 100Hz. Codec filters exaggerate this energy or introduce pre-echo artifacts. The solution connects back to your earlier work: thorough high-pass filtering (Step 1) and clean kick/bass separation (Step 2) reduce the unnecessary low-end information that codecs need to process, minimizing artifacts in the final stream.
Always run a codec preview before finalizing your master. iZotope Ozone’s Codec Preview or tools like Sonnox Pro-Codec let you hear exactly what your master will sound like after AAC or OGG conversion. If you detect differences in the sub region, revisit your EQ decisions below 100Hz.
Bonus: Low End Management in Dolby Atmos
With Apple Music accelerating Spatial Audio adoption, managing low end in Dolby Atmos mixes has become increasingly important. The fundamental principle: frequencies below 100Hz are non-directional. Sub bass belongs in the Bed, and only midrange harmonics should receive spatial movement and panning.
Use the LFE channel as a complementary element, not as the primary bass carrier. Core bass content belongs in the main channels (L/R or Center). Bass Management in Atmos playback redirects sub-80Hz content to the subwoofer regardless, so the sub bass in your main channels is what actually reaches the listener.
Monitoring: How to Verify What You Can’t Always Hear
The final piece of the sub bass processing puzzle is accurate monitoring. In untreated rooms, standing waves cause sub frequencies to boom at certain positions and cancel at others. Sonarworks SoundID Reference flattens your monitor’s frequency response through room calibration, giving you a more accurate picture of what’s actually happening in the sub region.
Tactile bass monitoring systems like the SUBPAC C1 let you physically feel sub frequencies through vibration. The Sonarworks and SUBPAC integration now allows you to export SoundID Reference calibration curves directly to the SUBPAC hardware, creating a more accurate sub bass monitoring chain — especially critical in untreated home studios.
At minimum, check your bass on three different playback systems: calibrated monitors, headphones (for sub detail verification), and a smartphone speaker (for harmonic translation confirmation). If the bass registers appropriately on all three, your sub bass processing chain is working.
The Complete Signal Chain Summary
- Step 1: High-pass filter (Pro-Q 4, 20-25Hz, Natural Phase, 24dB/oct)
- Step 2: Kick/bass separation (dynamic EQ sidechain, 50-80Hz region)
- Step 3: Parallel saturation (Saturn/Decapitator, 20-30% blend)
- Step 4: Multiband compression + subharmonic synthesis (Ozone Low End Focus / bx_subsynth)
- Step 5: Mono bass (M/S high-pass 120Hz, Side channel removal)
- Step 6: LUFS-aware limiting (-14 LUFS target, -1 dBTP true peak)
- Step 7: Codec preview and final adjustments
Apply these seven steps systematically, and your sub bass will translate consistently across Spotify, Apple Music, AirPods, club PA systems, and everything in between. Sub bass processing for streaming isn’t about making bass loud — it’s about making bass survive every format, codec, and speaker it encounters. In the streaming era, low end wins on quality, not quantity.
Need professional mixing, mastering, or Dolby Atmos production? Sean Kim brings 28 years of audio engineering expertise to every project.
Get weekly AI, music, and tech trends delivered to your inbox.


