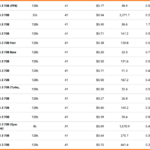
AI API Pricing December 2025: Complete Cost Comparison from GPT-5.2 to DeepSeek V3.2
December 26, 2025
Google DeepMind 2025 in Review: AlphaFold’s Nobel Legacy, Gemini Breakthroughs, and the Future of AI Research
December 29, 2025
Here’s an honest question as the year wraps up: out of every mix you finished this year, how many would you confidently play for a client right now without flinching? If that question made you uncomfortable, you’re not alone. Most producers lack a systematic approach to mix self-assessment techniques — they rely on gut feeling, and gut feeling has blind spots.
The gap between professional and amateur mixes rarely comes down to gear or plugins. It comes down to whether you have a repeatable system for evaluating your own work. After 28 years in music production, I can tell you that building this system was the single biggest upgrade to my workflow — bigger than any plugin purchase. Here are seven mix self-assessment techniques that will fundamentally change how you approach your mixes.
1. Reference Track Comparison — The Foundation of Mix Self-Assessment Techniques
Reference track comparison is the most accessible and arguably the most powerful evaluation method available to any producer. As professional engineer Matt McCracken noted in MusicRadar, referencing commercial releases is a zero-cost strategy that immediately elevates your mixing decisions.
But there’s a difference between casually playing a reference track and systematically comparing against one. Here’s how to do it right:
- Select 2-3 reference tracks in the same genre with similar instrumentation to your project
- Level-match your references to your mix — loudness differences will fool your ears every time
- Compare specific elements systematically: overall balance, low-end energy, vocal positioning, stereo image width, and high-frequency presence
- Import the reference directly into your DAW session for instant A/B switching
The key insight here is that referencing isn’t about copying — it’s about calibrating your ears to an industry-standard target before making critical mix decisions. Too many producers skip this step because they think it means admitting their mix isn’t good enough. In reality, every professional mastering engineer I’ve worked with over 28 years uses references constantly. Once I made this a non-negotiable part of every session, client revision requests dropped significantly. The mix decisions became faster and more confident because I always had a north star to compare against.
2. Multi-System Listening — Testing Your Mix Where It Actually Lives
Your studio monitors tell you one story. The real world tells you another. SoundGym’s mix evaluation guide makes this point clearly: a mix that only sounds good in your studio is only half-finished.
More than 90% of your listeners will hear your music through earbuds, car speakers, or Bluetooth speakers. Each of these systems reveals different aspects of your mix:
- Car speakers: The ultimate low-end truth detector. If your kick and bass overwhelm everything in the car, you’ve got too much energy below 100Hz
- Phone speakers: If vocals and melodies disappear on a phone speaker, your midrange clarity needs work. This is the most unforgiving test for mix balance
- Quality headphones (DT880 Pro, HD650): These reveal spatial details, reverb tails, micro-timing issues, and subtle noise that monitors might mask
- Consumer earbuds (AirPods, etc.): This is what your audience actually uses. If it sounds good here, you’ve won
Pro tip: keep notes on your phone as you listen on each system. Write quick observations like “Car — kick slightly boomy” or “AirPods — vocal clarity excellent.” When you return to your studio, these notes become a precise action list rather than vague memories. I keep a simple note template with four sections — one for each listening system — and fill it in during my multi-system check. It takes maybe 20 minutes total, and it consistently catches issues that I missed during hours of studio monitoring.
3. Frequency Analysis Tools and the 11-Question Self-Critique Framework
Your ears are remarkable instruments, but they have limitations — especially after hours of mixing the same track. Frequency analysis tools like SPAN, Voxengo SPAN Plus, or iZotope Insight provide visual confirmation of what your ears are telling you (or missing).
Here’s how to use spectrum analysis effectively without becoming a slave to the visual display:
- The analyzer is a secondary tool — always trust your ears for final decisions
- Compare your mix’s spectrum against your reference track’s spectrum to spot imbalances at a glance
- Watch for common problem areas: muddiness in the 200-500Hz range, harshness in the 2-5kHz range, and excessive air above 10kHz
- Use a stereo correlation meter alongside the spectrum analyzer to catch phase issues before they ruin your mono compatibility
Pair frequency analysis with Behind The Mixer’s 11-question self-critique framework, and you have a comprehensive evaluation system. As you listen through your mix, ask yourself these critical questions:
- Is the lead vocal (or lead instrument) sitting clearly at the front of the mix?
- Does every instrument have its own space, or are elements fighting for the same frequency range?
- Is there meaningful dynamic contrast between sections — can you feel the energy shift from verse to chorus?
- Does every effect (reverb, delay, chorus) serve a purpose, or was it applied out of habit?
- Is the frequency balance natural — are any bands poking out or missing entirely?
- Is compression working musically — or is it pumping, squashing, or robbing the track of life?
Print these questions out and stick them on your studio wall. Running through them takes five minutes and catches problems that hours of casual listening might miss. The beauty of combining frequency analysis with the self-critique framework is that one approach is objective (the numbers on your analyzer) and the other is subjective (your musical judgment). Together, they cover nearly every angle. I’ve seen producers transform their mix quality within weeks simply by making this dual check a habit at the end of every session.
4. Strategic Breaks and Blind A/B Testing
Ear fatigue is real, and it’s insidious because you don’t notice it happening. After two or three hours on the same track, your brain starts compensating for problems, normalizing imbalances, and filtering out issues that would be immediately obvious to fresh ears.
Here’s a strategic break protocol that works:
- Take a minimum 10-15 minute break every 45-60 minutes. During break time, avoid all music — silence or conversation is ideal
- For critical mix decisions (master bus EQ, final balance moves, overall level), sleep on it. Next-morning ears are the most honest ears you’ll ever have
- A walk or light exercise before a final listening session clears your auditory perception remarkably well
- First impressions after a break are the most valuable — note your immediate reactions before the critical brain kicks in
Blind A/B testing takes objectivity even further and is one of the mixing challenges recommended by iZotope for skill development. The technique is simple but powerful:
- Close your eyes and click a plugin’s bypass button several times randomly. Without knowing if it’s engaged or not, decide which version sounds better
- This eliminates confirmation bias — the tendency to prefer whichever version you think should sound better
- As Hyperbits emphasizes in their professional mixing tips, a reductive approach often wins: removing unnecessary processing almost always improves a mix more than adding more
- For major decisions, bounce two mix versions and ask a trusted colleague to blind test them for you
Blind testing has a humbling side effect: you’ll discover that some of your favorite “secret weapon” plugins aren’t actually doing much. That’s valuable information. I once blind-tested a chain of three compressors on a vocal bus and realized the middle one was doing absolutely nothing audible. Removing it cleaned up the signal path and actually improved the vocal clarity. The lesson? Every processor in your chain should earn its place, and blind A/B testing is the most honest audition process there is.
5. The Pre-Mastering Mix Review Checklist
Before you send a mix to mastering — or master it yourself — every track should pass this final quality gate. Mastering cannot fix fundamental mix problems. It can enhance a great mix, but it cannot rescue a flawed one.
- Headroom: Is your master fader peaking between -3dB and -6dB? Mastering engineers need room to work
- Low-end hygiene: Have you high-passed every track that doesn’t need sub frequencies? Guitars, vocals, synth pads, overheads — if it’s not kick or bass, filter the lows
- Phase coherence: When you sum to mono, does anything thin out or disappear? If so, you have phase cancellation issues that need fixing
- Clipping: Is any individual channel clipping? Check every bus, every send, every return
- Automation: Are vocal levels consistent? Do instrument balances shift naturally across sections?
- Fades: Are the song’s beginning and ending clean? No stray noises, no abrupt cuts?
- Noise floor: Listen carefully during quiet passages — clicks, pops, hum, or digital artifacts lurking in the silence?
- Flow: Play the entire track from start to finish without stopping. Does the overall journey feel natural and musical?
Save this checklist as a template in your DAW’s project notes or as a printed sheet next to your monitors. Use it for every single project without exception. It might feel tedious the first few times, but it quickly becomes second nature — like a pilot running through pre-flight checks.
As the year comes to a close, try revisiting your mixes from the past twelve months and scoring them against this checklist. You’ll spot patterns in your weak areas — maybe you consistently under-manage low-end, or your automation could use more attention. Perhaps you keep rushing the fade-out, or your headroom is always tighter than it should be. That kind of self-awareness is what drives real improvement heading into the new year. Make a note of your top three recurring issues and prioritize fixing those habits in your next project.
These seven mix self-assessment techniques — reference comparison, multi-system listening, frequency analysis, the self-critique framework, strategic breaks, blind A/B testing, and a pre-mastering checklist — form a complete system for evaluating your mixes objectively. Stop relying on gut feeling alone. Build the system, trust the process, and watch your mixes improve consistently, project after project.
Need professional mixing, mastering, or personalized feedback on your mix self-assessment workflow? Let’s talk.
Get weekly AI, music, and tech trends delivered to your inbox.


