
Poe AI Multi-Model Conversations: How Quora’s Platform Lets You Compare 100+ AI Models in One Chat
September 22, 2025
Best Smart Home Cameras September 2025: 7 Indoor and Outdoor Security Picks Compared
September 22, 2025
Your mix sounds incredible in your studio — punchy kick, crisp vocals, wide stereo image. Then you play it in the car, and suddenly everything sounds muddy and thin. Sound familiar? The problem isn’t your monitors or your room. It’s that you’re mixing in a vacuum, without a scientifically grounded benchmark to keep your ears honest.
Reference tracks mixing isn’t just a “nice to have” — it’s the single most reliable method for closing the gap between your mixes and commercially released music. And when you approach it with the right methodology, using LUFS-calibrated level matching, frequency spectrum analysis, and purpose-built A/B comparison tools, the results are transformative. After 28 years of mixing and mastering, I can tell you that the producers who reference consistently produce better work, period.
Why Your Ears Lie: The Science Behind Mix Referencing
Here’s the uncomfortable truth: your ears are unreliable instruments. After just 15-20 minutes of mixing, you experience auditory fatigue — your perception of frequency balance shifts, and what sounded bright now sounds normal. This is well-documented in psychoacoustics research, including studies presented at AES conventions. Your brain literally recalibrates to whatever you’ve been listening to, which means every mixing decision you make after that initial window is based on a distorted perception of reality.
Reference tracks act as a perceptual anchor. When you switch from your mix to a professionally mastered track and back, you’re essentially resetting your ears’ calibration point. But this only works if you do it correctly — and most producers don’t.
Step 1: Choosing the Right Reference Tracks
Not every commercially released song makes a good reference. The track needs to match your production in three critical ways:
- Genre and energy level — A reference track mixing comparison only works when the overall sonic character aligns. Don’t reference a Billie Eilish track when you’re mixing a metal song.
- Instrumentation density — Match the complexity. A sparse acoustic track and a dense electronic production have fundamentally different frequency distributions.
- Release era — Production standards evolve. A 2025 mix should be referenced against recent releases, not classics from the 1990s (unless you’re deliberately going for that aesthetic).
I recommend maintaining a personal reference library of 8-12 tracks across the genres you regularly work in. Label them by characteristics: “punchy low end,” “wide stereo image,” “vocal-forward mix,” “aggressive compression.” This way, you can pull the right reference for each specific element you’re evaluating.
Step 2: LUFS-Based Level Matching — The Non-Negotiable Foundation
This is where most producers fail, and it’s the single biggest mistake in reference tracks mixing. If your reference track is louder than your mix, it will always sound better — not because it actually is better, but because of the equal-loudness contour effect. Our ears perceive louder audio as having more bass, more clarity, and more presence.
The solution is LUFS (Loudness Units Full Scale) matching. A commercially mastered track typically sits between -8 to -14 LUFS integrated, depending on genre. Your unmastered mix is probably around -18 to -22 LUFS. That’s a 6-10 dB perceived loudness difference — enough to make any comparison meaningless.
How to match levels properly:
- Import your reference track into your DAW session on a dedicated stereo track
- Route it directly to your monitoring output, bypassing your mix bus processing
- Use a loudness meter (LUFS) on both your mix bus and the reference track
- Reduce the reference track’s gain until the integrated LUFS readings match — typically 6-10 dB of attenuation
- Verify with short-term LUFS (3-second window) during the loudest sections
Tools like ADPTR Metric AB handle this automatically. You load up to 16 reference tracks, and Metric AB level-matches them to your mix in real time. It’s the fastest, most accurate way to eliminate loudness bias from your comparisons.
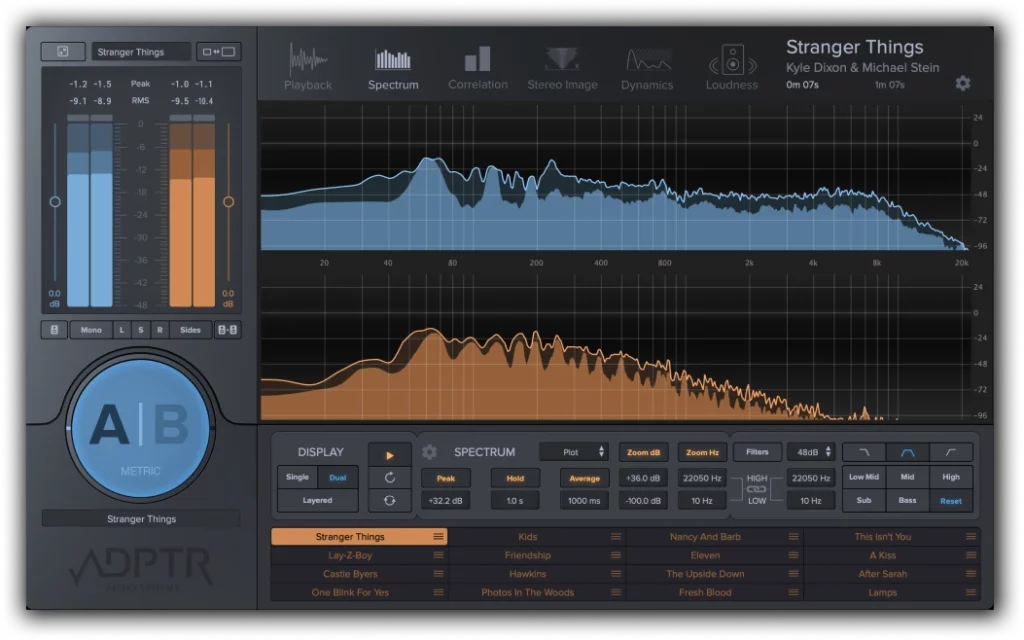
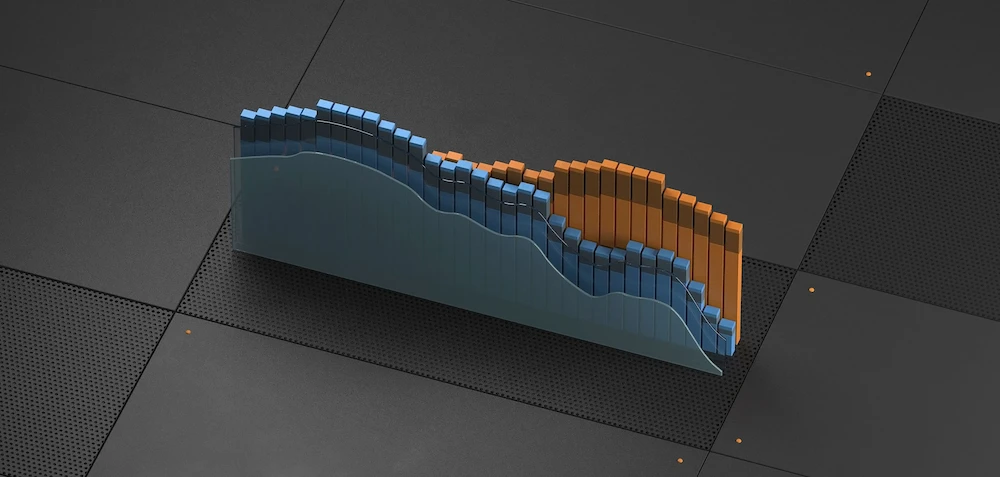
Step 3: Frequency Spectrum Analysis — See What You Can’t Hear
Once your levels are matched, the real analytical work begins. A spectrum analyzer lets you visually compare the frequency distribution of your mix against the reference. This is especially valuable for identifying problems in the low-mid range (200-500 Hz), where mud accumulates, and in the high frequencies (8-16 kHz), where air and presence live.
The EQ Match approach with FabFilter Pro-Q 4:
- Place Pro-Q 4 on your mix bus
- Capture a frequency snapshot of your reference track using the EQ Match feature
- Then capture your mix’s frequency profile
- Pro-Q 4 generates an EQ curve showing exactly where your mix deviates from the reference
- Use this as a diagnostic tool — don’t blindly apply the full correction curve. Instead, identify the 2-3 biggest deviations and address them at the source (individual tracks), not on the mix bus
This is a crucial distinction that separates scientific mixing from lazy mixing. The EQ Match feature tells you what’s different; your engineering judgment determines why and how to fix it. Maybe your low end is 3 dB heavier than the reference — but is that because your kick is too loud, your bass has too much sub content, or your mix is fundamentally arranged differently? The answer changes the fix.
Step 4: The A/B Comparison Workflow — Timing Matters
Random switching between your mix and the reference isn’t effective. A structured A/B workflow produces better results:
- Compare matched sections — Chorus to chorus, verse to verse. Don’t compare your verse to the reference’s chorus; the energy levels are too different.
- Listen for one element at a time — First pass: low end only. Second pass: vocal level and presence. Third pass: stereo width. Trying to evaluate everything at once leads to analysis paralysis.
- Use short listening windows — 5-10 seconds of reference, then immediately switch to your mix. Longer listening periods let your ears re-adapt, defeating the purpose.
- Reference at multiple points — Check references at the beginning of your session, after every 20-30 minutes of work, and before finalizing any major balance decisions.
ADPTR Metric AB makes this workflow seamless. You can set up instant A/B switching with level-matched references and use the built-in spectrum analyzer, stereo imager, and dynamics meter to compare specific characteristics visually while you listen.
Step 5: Dynamic and Stereo Reference Checks
Frequency balance is just one dimension. Two other critical comparisons often get overlooked:
Dynamic Range Comparison
Compare the dynamic range between your mix and the reference. How much difference is there between the quietest and loudest moments? Modern pop and EDM typically have 6-8 dB of dynamic range (measured as the difference between short-term LUFS peaks and integrated LUFS). Jazz and acoustic genres might have 12-18 dB. If your dynamic range doesn’t match the genre convention, your mix will feel either lifeless (over-compressed) or inconsistent (under-compressed).
Stereo Width Analysis
Use a correlation meter and stereo vectorscope to compare the stereo image. Most commercial mixes maintain a correlation coefficient above 0.3, with the center (vocals, kick, bass, snare) tightly focused and the sides (guitars, synth pads, reverb tails) providing width. If your mix is significantly wider or narrower than the reference, investigate which elements are causing the discrepancy.
Essential Reference Track Plugins for 2025
The reference tracks mixing toolkit has matured significantly. Here are the tools that provide the most analytical depth:
- ADPTR Metric AB ($149) — The industry standard. 16 reference slots, automatic level matching, 5 analysis modes (spectrum, stereo, dynamics, loudness, phase). Drag-and-drop simplicity with deep analytical capability.
- FabFilter Pro-Q 4 ($189) — Not strictly a reference plugin, but the EQ Match feature is invaluable for frequency comparison. Natural phase modes and per-band mid/side processing add surgical precision.
- Mastering The Mix REFERENCE 2 ($99) — Purpose-built for A/B referencing with tonal balance overlays, LUFS matching, and stereo width comparison. Clean, focused interface.
- iZotope Tonal Balance Control 2 (included in Music Production Suite) — Shows your mix’s frequency distribution against genre-specific target curves. Not a direct A/B tool, but excellent for checking if your overall tonal balance is in the right ballpark.
- Waves PAZ Analyzer ($49) — A workhorse spectrum analyzer and stereo position display. Great for quick visual checks when you don’t need the full reference workflow.
Common Mistakes That Undermine Reference Track Mixing
Even experienced engineers fall into these traps:
- Using MP3 references — Lossy compression removes high-frequency detail and subtly changes the stereo image. Always use WAV or FLAC for reference tracks.
- Referencing only at the end — By the time you’re “done” mixing, you’ve made hundreds of decisions in a perceptual vacuum. Reference early and often.
- Copying the reference exactly — The goal isn’t to clone another mix. It’s to use the reference as a calibration tool for your own artistic decisions. Your mix should sound like your mix — just better balanced.
- Ignoring the arrangement difference — If your song has fewer instruments than the reference, your frequency spectrum will naturally look different. That’s not a problem to fix.
- Not updating your reference library — Production standards shift. Update your references annually to stay current with modern mixing trends.
Building a Scientific Reference Workflow: The Complete Process
Here’s the step-by-step workflow I use for every mix, refined over nearly three decades of professional audio work:
- Before mixing — Select 2-3 references that match the target sound. Import into the session. Level-match using LUFS.
- During rough mix — A/B every 20 minutes. Focus on overall tonal balance and vocal level. Use spectrum analysis to identify major frequency deviations.
- During detail work — Reference specific elements: kick/bass relationship, vocal presence, high-frequency air. Use 5-10 second comparison windows.
- Before finalizing — Full-section comparisons (verse, chorus, bridge). Check dynamics and stereo width against reference. Document any intentional deviations.
- Quality check — Export your mix at the same loudness as the reference (use a limiter to match LUFS temporarily). Listen on headphones, car speakers, and phone speakers. If it translates as well as the reference, you’re done.
The beauty of this approach is that it’s completely genre-agnostic. Whether you’re mixing hip-hop, orchestral film scores, or ambient electronic music, the scientific principles remain the same: calibrate your perception, compare objectively, and make informed decisions.
Reference tracks mixing transforms the mixing process from subjective guesswork into an evidence-based practice. You don’t need golden ears — you need a calibrated workflow. Start implementing these techniques in your next session, and I guarantee you’ll hear the difference in your final mix.
Need professional mixing, mastering, or help optimizing your studio reference workflow? With 28+ years of experience in music production and audio engineering, I can help you achieve commercially competitive results.
Get weekly AI, music, and tech trends delivered to your inbox.


