Cursor 1.5 Update: Linear Integration Turns Background Agents Into Your Newest Teammate
August 22, 2025
Best PC Builds Under $1000 for Back-to-School 2025: 3 Gaming & Study Rigs Compared
August 22, 2025
After 28 years of working with orchestras — both real and virtual — I can tell you exactly where most orchestral mockups fall apart. It’s not the sample library. It’s not the reverb. It’s the template. A poorly structured orchestral mockups template turns every new project into a fight against your own DAW, while a well-designed one lets you compose as fast as you can think. Here’s how to build one that actually works.
Orchestral Mockups Start With Template Architecture
The difference between a hobbyist template and a professional one isn’t the number of tracks — it’s the routing logic. A professional orchestral template mirrors how a real orchestra sits on stage, and more importantly, how a scoring stage engineer would mic and submix it.
Start with four primary section folders: Strings, Brass, Woodwinds, and Percussion. Within each folder, create individual instrument tracks (Violins I, Violins II, Violas, Cellos, Basses for strings, and so on). Each instrument track should route to a section bus before hitting the master output.
Here’s the bus structure I recommend:
- Section Buses — STR Bus, BRS Bus, WW Bus, PERC Bus. These handle section-level EQ, compression, and spatial positioning.
- Stem Buses — Orchestra Full, Orchestra Lite (strings + woodwinds only for intimate passages). These are your delivery stems.
- Reverb Sends — Early Reflections (short room), Tail (concert hall). Send amounts per section create natural depth — strings get more early reflections, brass gets more tail.
- Reference Track — A muted track where you import commercial recordings for A/B comparison.
This routing means you can solo an entire string section with one click, adjust the overall brass level without touching individual tracks, and export proper stems for the dubbing stage. It takes an hour to set up and saves hundreds of hours over the life of the template.
Articulation Management: Keyswitches vs. Expression Maps vs. Single Tracks
This is where the holy wars happen. There are three approaches to managing articulations, and each has legitimate use cases.
Keyswitches (The Traditional Method)
Most sample libraries ship with keyswitch patches that let you toggle between sustain, staccato, tremolo, and other articulations using low MIDI notes (typically C0–B0). The advantage is simplicity — one track per instrument, all articulations accessible. The disadvantage is that your MIDI data becomes harder to read, and switching articulations mid-phrase can introduce timing artifacts if you’re not careful.
Expression Maps (Cubase) / Articulation Sets (Logic)
Cubase’s expression map system is, in my experience, the most elegant solution available. You define articulation slots that can trigger keyswitches, program changes, or CC values — all hidden behind a clean visual interface. The key editor shows articulation names directly on the MIDI notes, so you always know what’s playing. Logic Pro’s articulation sets offer similar functionality but with a slightly different workflow. For large templates, expression maps save enormous amounts of time during editing because you can see and change articulations without hunting for keyswitch notes buried below the staff.
Single-Articulation Tracks
Some composers — particularly those working in large-scale film scoring — use a separate track for every articulation. Violins I Sustain, Violins I Staccato, Violins I Tremolo, each on its own track. This creates enormous track counts (300+ tracks is common) but offers total visual clarity and independent mixing per articulation. If you run Vienna Ensemble Pro on a separate machine, track count becomes less of an issue.
My recommendation: use expression maps for sketch templates where speed matters, and single-articulation tracks for final mockup templates where detail and mixing flexibility are paramount. Forums like VI-Control show that top professionals are split roughly 50/50 between these two approaches.
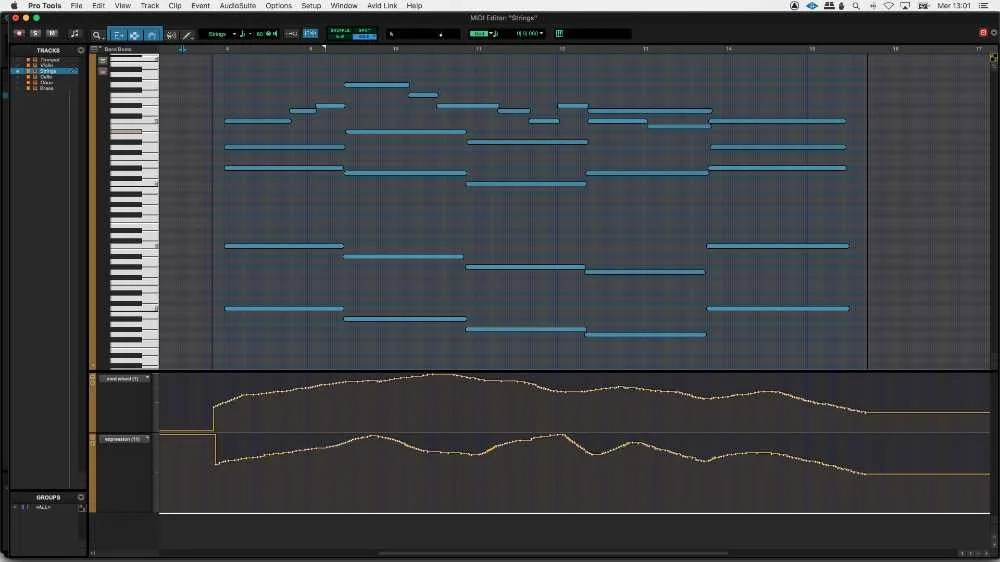
CC Programming: The Secret to Realistic Orchestral Mockups
If there’s one thing that separates amateur mockups from professional ones, it’s CC automation. You can have the most expensive libraries in the world, but without proper CC programming, they’ll sound like a keyboard demo.
As Production Expert explains, the coordination between CC1 and CC11 is what creates the illusion of a living, breathing ensemble. Here’s what each controller does and how to use them together:
CC1 — Modulation (Dynamic Layer Crossfade)
CC1 controls which dynamic layer plays. At low values, you get a soft, intimate pianissimo recording. Push it up and you crossfade into mezzo-forte, then forte, then fortissimo samples. This isn’t just a volume change — the timbre, bow pressure, embouchure, and room energy all shift with real recorded dynamics. Think of CC1 as “how hard the musician is playing.”
Key technique: draw smooth CC1 curves that follow the musical phrase. A crescendo isn’t a straight ramp — it accelerates, like a real musician leaning into the phrase. Start the curve slowly, then steepen it toward the peak.
CC11 — Expression (Volume Envelope)
CC11 is your real-time volume control within the dynamic layer set by CC1. Use it to shape the attack and release of individual notes, create subtle swells within sustained chords, and taper phrase endings naturally. If CC1 is “how hard,” CC11 is “how loud right now.”
The magic happens when you combine them. A passage might sit at CC1=90 (forte layer) while CC11 dips and swells between 70-110 to add phrase-level dynamics. This creates motion without jumping between sample layers.
CC64 — Sustain Pedal (Articulation Trigger)
CC64 does double duty in many orchestral libraries. Beyond its traditional sustain function, some libraries use it to trigger legato transitions or toggle between sustain and staccato modes. Check your library’s documentation — misusing CC64 is a common source of stuck notes and strange behavior.
Sample Libraries by Budget: Building Your Orchestral Toolkit
Your template is only as good as the instruments loaded into it. Here’s a practical breakdown by budget tier, based on what I’ve used and what the industry consistently recommends:
Free Tier (Getting Started)
- Spitfire LABS — Not a full orchestra, but the Strings and Soft Piano patches are genuinely usable in production. Zero excuses not to have this installed.
- BBC Symphony Orchestra Discover — A complete orchestral palette for free (after a short waiting period). Limited articulations and mic positions, but the tone is authentic Maida Vale Studios recording quality.
- ProjectSAM Free Orchestra — Basic but decent orchestral sounds.
Mid Tier ($200–$800)
- BBC Symphony Orchestra Core — The sweet spot for most composers. More articulations and mic positions than Discover, same beautiful recording quality.
- Orchestral Tools Berlin Inspire — Ensemble patches with a warm, cinematic character. Great for sketching.
- Native Instruments Symphony Series — Clean, versatile, well-mapped for Kontakt users.
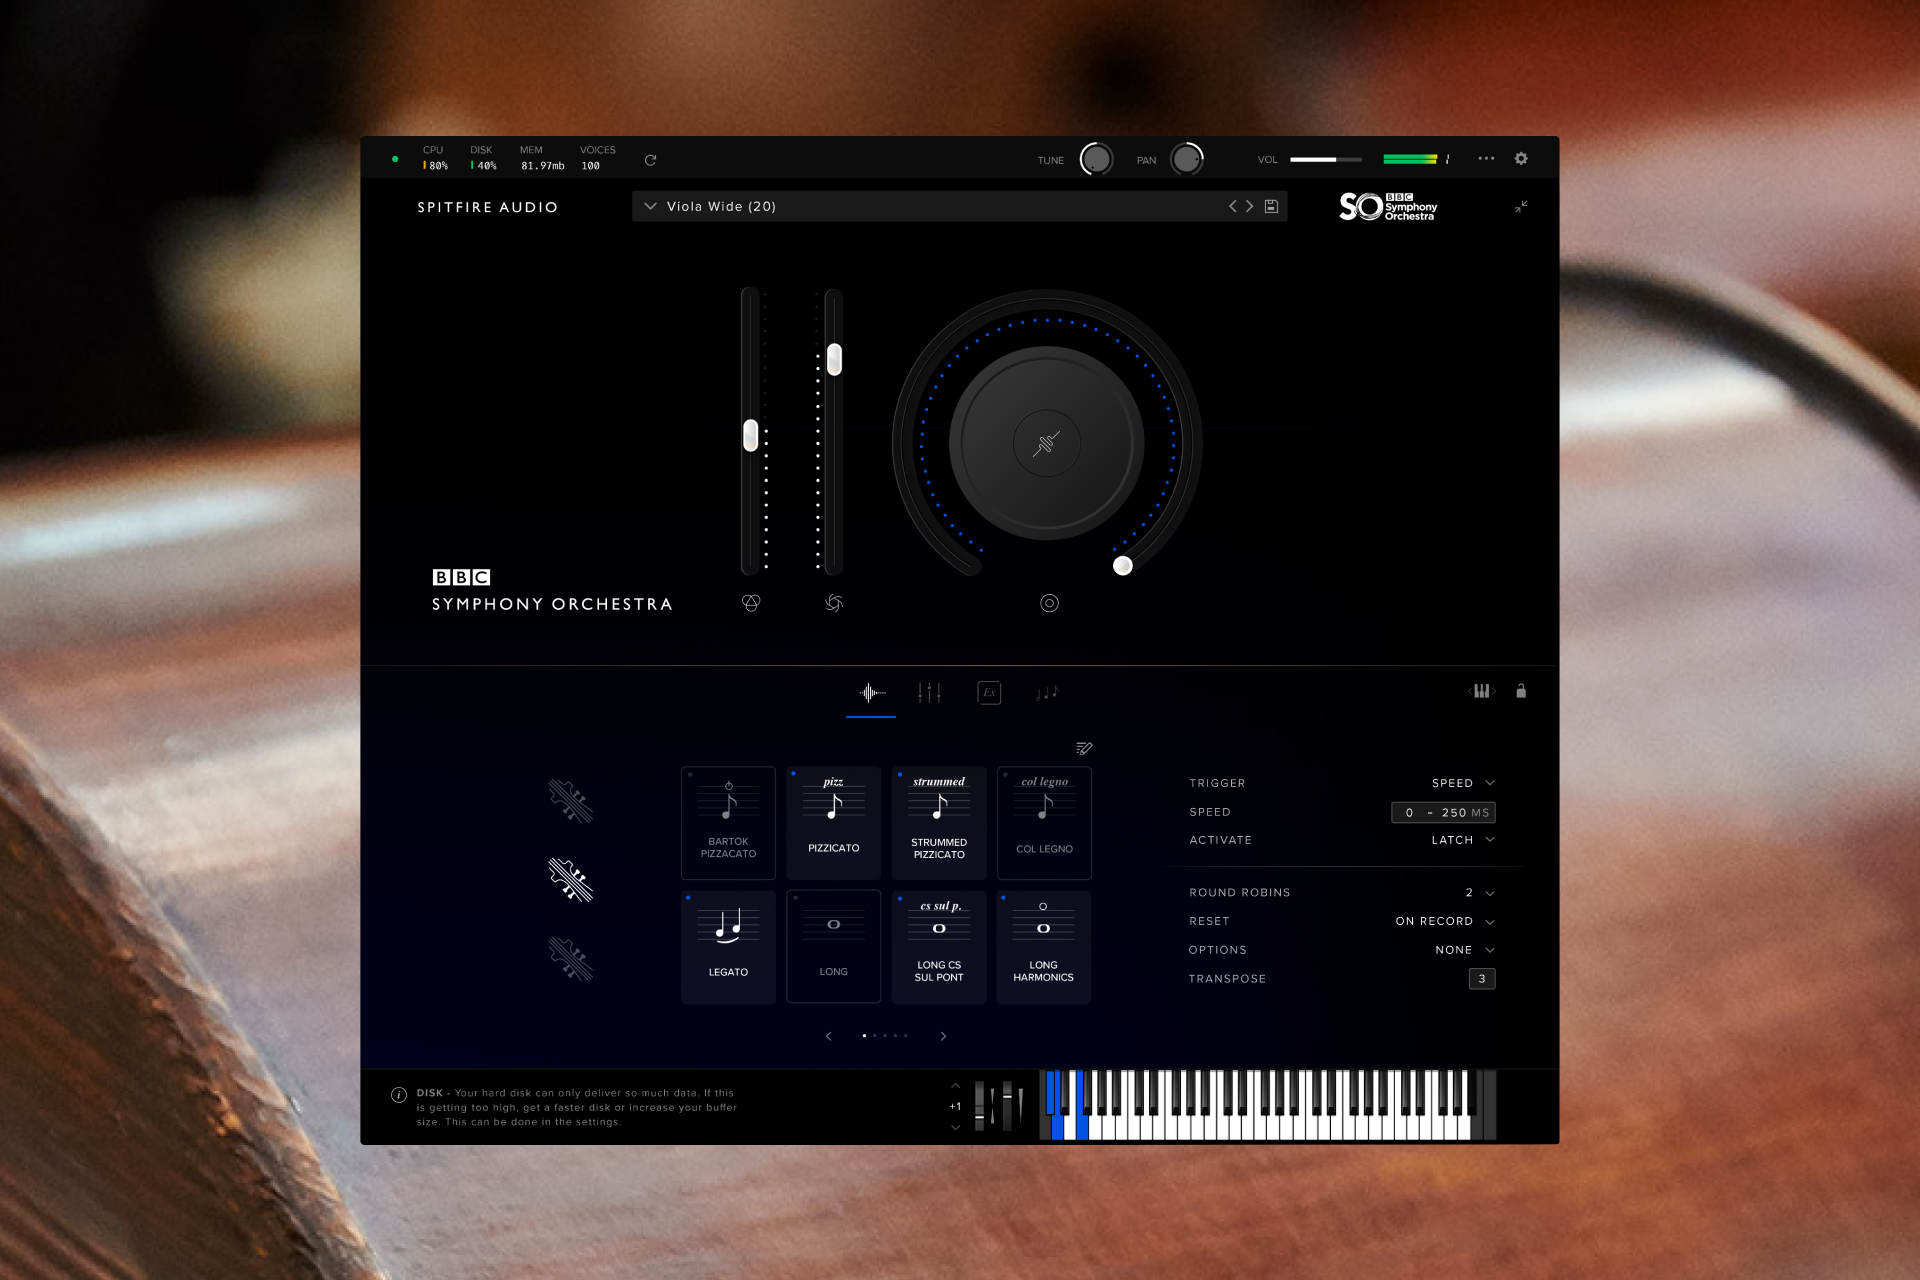
Professional Tier ($1,000+)
- BBC Symphony Orchestra Professional — 67 instrument presets, 468 techniques, 45 legato articulations, 20 microphone signals. This is a complete orchestral toolkit recorded in one of the world’s finest scoring stages.
- Vienna Synchron Series — Unmatched depth of articulations. The Vienna Synchron Player offers superior CPU efficiency. Best for detail-obsessed composers.
- EastWest Hollywood Orchestra — The Hollywood sound. Rich, present, mix-ready out of the box. Runs on EastWest’s OPUS engine.
- Orchestral Tools Berlin Series — Section-by-section purchases (Berlin Strings, Berlin Brass, Berlin Woodwinds). Warm, characterful, great legatos.
Pro tip: don’t buy everything from one developer. Layering Spitfire strings with Berlin brass and Vienna woodwinds can create a richer, more unique palette than any single library achieves alone.
DAW-Specific Optimization and VEPro Hosting
Your DAW choice shapes your template workflow more than you might expect.
Cubase remains the film scoring industry workhorse for good reason. Expression maps, the Logical Editor for batch MIDI operations, and rock-solid VST3 hosting make it ideal for large templates. Use folder tracks with routing enabled to create collapsible section groups that also function as mix buses.
Logic Pro has closed the gap significantly. Articulation sets, track stacks, and the new MIDI plugins offer comparable functionality. The built-in reverbs (ChromaVerb, Space Designer) are excellent for orchestral work. The limitation is macOS only, which can be an issue for VEPro multi-machine setups.
Pro Tools is less common for MIDI-heavy mockup work but remains relevant if you’re also recording live overdubs or delivering to mixing stages that require Pro Tools sessions.
Vienna Ensemble Pro and RAM Management
Once your template exceeds 32GB of samples, you need a strategy. Vienna Ensemble Pro (VEPro) lets you host instruments in a separate process — or on a separate computer entirely — keeping your DAW lean. Key optimization techniques:
- Purge on load — Load all instruments but purge samples from RAM. They load on demand when you play a note. This can cut RAM usage by 80%.
- Background loading — Enable sample streaming from SSD so only the attack portion loads into RAM.
- Disabled tracks — In Cubase, disabled tracks don’t load their plugins at all. Keep rarely-used articulations on disabled tracks and enable them only when needed.
- Template tiers — Maintain a “Sketch” template (light, fast to load) and a “Full Mockup” template (everything loaded). Start compositions in Sketch, migrate to Full for final production.
Humanization: Making Machines Breathe
A technically perfect mockup sounds wrong because real orchestras are never technically perfect. Humanization is the final layer that transforms a MIDI sequence into something that could fool a listener.
Velocity variation: No two notes in a real performance have identical velocity. After programming your parts, add random velocity variation of ±5-10 to sustained passages and ±15-20 to rhythmic passages. But don’t randomize blindly — musical accents and phrase shapes should remain intact.
Timing offsets: Real musicians don’t play exactly on the grid. Strings tend to be slightly ahead of the beat (more aggressive), while brass often sits slightly behind (heavier). Add subtle timing offsets per section: strings -5 to -15ms early, brass +5 to +10ms late, woodwinds roughly on the grid but with individual note variation of ±10ms.
Breathing pauses: Wind and brass players need to breathe. If you write a long flute melody with no gaps, it immediately sounds fake regardless of how good the samples are. Insert small gaps (one sixteenth note or less) at natural phrase boundaries. For sustained string passages, add slight volume dips at bow changes.
Section spread: In a real string section, 16 violinists play slightly different timing and intonation. Some libraries (like CSS or Berlin Strings) model this automatically. For libraries that don’t, duplicate the patch with slight detuning (±5 cents) and timing offset to simulate section width.
Listen to real orchestras: This is the most underrated advice in orchestral mockup production. Spend time with scores and recordings. Notice how the oboe enters slightly after the strings in a unison passage. Notice how the timpani roll builds asymmetrically. These tiny human imperfections are what make an orchestra sound alive — and they’re exactly what your template should replicate.
Building a realistic orchestral template isn’t a weekend project — it’s an ongoing process that evolves with every score you write. Start with solid routing, master your CC automation, choose libraries that complement each other, and never stop studying how real musicians play. The template is your instrument. Build it with the same care a violinist gives to their bow.
Whether you’re building your first orchestral template or optimizing an existing one, professional guidance can save you months of trial and error. From mixing and mastering to full production support — let’s talk about your project.
Get weekly AI, music, and tech trends delivered to your inbox.


