
AI Music Generation Copyright Settlement Reshapes the Industry: What Suno and Udio Deals Mean for 2026
November 25, 2025
NeurIPS 2025 Best Paper Awards: 7 Groundbreaking AI Studies That Will Shape 2026
November 26, 2025
I used to spend 45 minutes setting up every single mix session — loading plugins, creating buses, color-coding tracks, routing sends. Then I built my first professional mix template, and that 45 minutes turned into 3. After 28 years of mixing, I can tell you without hesitation: a well-built mix template is the single biggest workflow upgrade you’ll make this year.
What Exactly Is a Professional Mix Template?
A professional mix template is a pre-configured DAW session with your preferred track layout, bus routing, plugin chains, and color coding — minus the audio. Think of it as your mixing cockpit: every fader, every send, every effect return is exactly where you need it before a single note plays. Andrew Scheps, who’s mixed for Adele, Red Hot Chili Peppers, and Jay-Z, released his updated 2025 Pro Tools template through Puremix, demonstrating how even top-tier engineers rely on templates to maintain consistency across thousands of sessions.
But here’s the key distinction most producers miss: a template isn’t a preset for your mix. It’s an organizational framework. As Scheps himself puts it, it’s about “letting go” — removing decision fatigue so you can focus entirely on what the music needs.
Step 1: Define Your Bus Routing Architecture
Bus routing is the backbone of any professional mix template. Without a clear signal flow hierarchy, you’ll end up with a tangled mess that defeats the entire purpose of using a template. Here’s the routing structure I’ve refined over years of mixing:
The Core Bus Hierarchy
- Drum Bus — All drum tracks (kick, snare, hi-hat, toms, overheads, room mics) feed into a single drum bus with light glue compression
- Bass Bus — Bass DI and amp tracks, often with a parallel saturation send
- Instrument Bus — Guitars, keys, synths, and other melodic elements
- Vocal Bus — Split into Lead Vocal sub-bus and Backing Vocal sub-bus for granular control
- FX Bus — All reverb and delay returns consolidated before hitting the mix bus
- Mix Bus — Everything converges here with gentle bus compression and EQ
This hierarchy gives you macro control (pull down the drum bus by 2dB and every drum track follows) while preserving micro control on individual channels. Andrew Scheps takes this further with his famous “Rear Bus” — a parallel processing chain that adds density and excitement without touching the clean signal path.
VCA Groups: The Secret Weapon
If you’re using Pro Tools, Logic Pro, or Cubase, VCA (Voltage Controlled Amplifier) groups are a game-changer for professional mix templates. Unlike regular groups that affect the actual signal, VCA groups control the levels of multiple faders without altering individual track automation. This means you can ride the overall drum level during a chorus without overwriting the intricate snare fills you’ve already automated. Scheps’ 2025 template uses clearly labeled VCA groups that allow entire sections of the mix to move with a single fader — streamlining decision-making during critical mix moments.
Step 2: Set Up Gain Staging Correctly
Gain staging might sound boring, but it’s the difference between a mix that sounds clean and punchy versus one that’s distorted or lifeless. The professional standard is simple: -18dBFS average on every channel feeding into every plugin. This is the sweet spot where most digital and analog-modeled plugins perform best.
Here’s how to bake proper gain staging into your template:
- First insert on every track: a gain/trim plugin — Use your DAW’s native utility plugin (Logic’s Gain, Pro Tools’ Trim, Ableton’s Utility) as the very first insert. This lets you adjust input level before hitting any processing
- Target -18dBFS average — Not peak, average. Peaks can hit -12dBFS or even -6dBFS without issue, but your average should hover around -18dBFS
- Mix bus headroom — Leave at least 6dB of headroom on your mix bus. If your mix bus is hitting 0dBFS before mastering, you’re pushing too hard
- Color-code gain plugins differently — I use white for gain/trim plugins so they’re visually distinct from actual processing
This approach ensures every plugin in your chain receives signal at the optimal level, resulting in better saturation characteristics, more accurate compression behavior, and cleaner overall tone.
Step 3: Build Your Plugin Chains
Now for the part everyone gets excited about — plugins. But before you load 15 plugins on every channel, remember: a template’s plugin chain should be a starting point, not a finished mix. Load plugins in bypass mode and activate only what the specific song needs.
Essential Channel Strip Chain
- Gain/Trim (always on) — Input level control
- High-pass filter/EQ (bypass) — Subtractive EQ for cleanup
- Compressor (bypass) — Dynamic control when needed
- Additive EQ (bypass) — Tonal shaping
- Saturation (bypass) — Harmonic enhancement for tracks that need warmth
Vocal Chain (Lead Vocal Template)
The vocal chain deserves special attention because it’s usually the most processing-heavy chain in any mix. Here’s my proven order:
- Gain/Trim → set to -18dBFS average
- Subtractive EQ → roll off below 80Hz, notch out problem resonances
- De-esser → tame sibilance before compression to avoid pumping artifacts
- Fast compressor → FET-style (1176 emulation) for peak control, 4:1 ratio
- Slow compressor → Opto-style (LA-2A emulation) for smooth leveling
- Additive EQ → presence boost around 3-5kHz, air boost at 12kHz+
- Limiter (bypass) → safety net for extreme dynamics
Andrew Scheps achieves something similar with his iconic “Vocal Polytech” chain, which layers multiple compression stages with carefully calibrated plugin interactions. The principle is the same: each stage does a little work so no single plugin is working too hard.
Step 4: Create Your Effects Returns
Auxiliary channels for time-based effects are a critical part of any professional mix template. Pre-create these and you’ll never waste time setting up sends mid-session:
- Short Room Reverb — 0.5-1.2s decay, great for drums and percussion
- Medium Hall Reverb — 1.8-2.5s decay, for instruments and backing vocals
- Vocal Plate Reverb — Classic plate with pre-delay around 60-80ms, dedicated to vocals
- Slapback Delay — 80-120ms, mono, for adding depth without obvious echo
- 1/4 Note Delay — Tempo-synced, stereo, for rhythmic vocal effects
- Long Throw Delay — 1/2 note or dotted 1/4, for dramatic moments
Set all effects returns to 100% wet. Mute all sends by default. This way, activating a reverb send on any track is a one-click operation — unmute the send, set the level, done. No loading plugins, no configuring aux channels, no routing headaches.
Step 5: Color Coding and Organization
Visual organization isn’t just aesthetic — it directly impacts mixing speed. When you can identify track groups by color at a glance, you make faster decisions. Here’s a color scheme that works across all major DAWs:
- Red — Drums and percussion
- Orange — Bass
- Yellow — Guitars and acoustic instruments
- Green — Keys, synths, pads
- Blue — Lead vocals
- Purple — Backing vocals and harmonies
- Pink — Effects returns (reverbs, delays)
- Gray — Reference track and utility channels
Consistency is what matters here. Once you commit to a color scheme, your brain builds visual shortcuts — you’ll start reaching for the right fader before you even read the label.
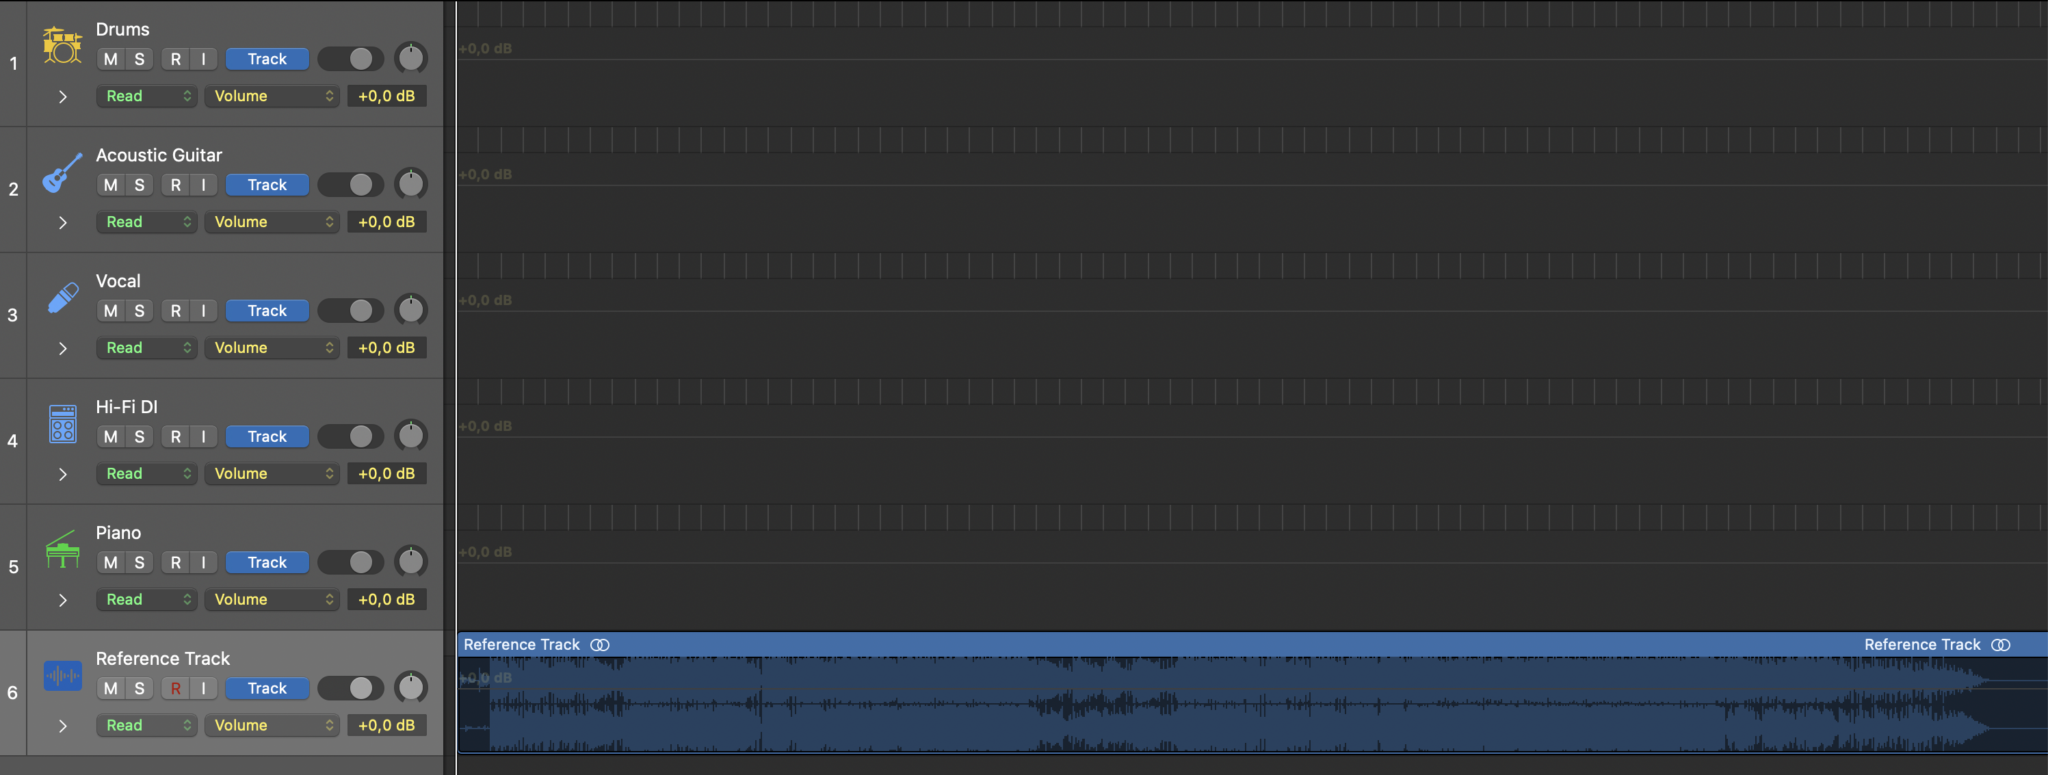
Step 6: The Reference Track Channel
This is the most underrated component of a professional mix template. Create a dedicated stereo track routed directly to your monitor output — bypassing the mix bus entirely. Drop in a commercially mastered reference track and use it for A/B comparisons throughout your mix. This keeps you honest about tonal balance, dynamics, and stereo width.
Pro tip: include a gain plugin on the reference track set to approximately -6dB to -10dB to match the loudness of your unmastered mix. Without level matching, the louder mastered reference will always sound “better,” leading you to push your mix too hard.
Step 7: Genre-Specific Template Variations
One template doesn’t fit all genres. Once you have your master template, create genre-specific variations:
- Pop/R&B Template — Extra vocal sub-buses (ad-libs, doubles, harmonies), tuning plugin slot, wider stereo bus processing
- Rock Template — Multiple guitar buses (clean/distorted/acoustic), room mic bus, parallel drum crush bus
- Hip-Hop/Trap Template — 808 sub-bass dedicated bus with sidechain from kick, vocal effects chain with autotune slot, sample bus
- EDM/Electronic Template — Synth layering buses, sidechain compression matrix, FX automation lanes pre-built
- Acoustic/Singer-Songwriter Template — Minimal track count, emphasis on natural reverb spaces, stereo mic pair routing
Save these as separate template files and name them clearly. I use a naming convention like MIX_TEMPLATE_POP_v3_2025.ptx — genre, version number, and year so you know exactly which iteration you’re on.
Black Friday 2025: Best Deals for Building Your Template
If you’re building or upgrading your mix template this Black Friday, here are the deals worth grabbing right now for essential mixing tools:
- FabFilter — 25% off all plugins and bundles. Pro-Q 3 and Pro-C 2 are staples for any template’s EQ and compression slots
- Waves — Up to 94% off bundles. The Platinum Bundle at €162 (93% off) includes CLA compressors, SSL channel strips, and Renaissance EQ — solid template workhorses
- Universal Audio — Up to 50% off native UAD plugins. The Neve 1073 and API 2500 emulations are premium channel strip options
- iZotope — Ozone 11 Advanced at $209 (58% off), Neutron 4 at $149 (63% off). Neutron’s intelligent channel strip is perfect for a template’s adaptive processing slot
- Sonnox — Up to 75% off. The Oxford Dynamics and Oxford EQ remain industry-standard channel strip tools
- MeldaProduction — Up to 91% off complete bundles. Incredible value for comprehensive plugin collections at budget-friendly prices
The smartest approach: invest in a few surgical tools (FabFilter Pro-Q 3 for EQ, Pro-C 2 for compression) and one comprehensive bundle (Waves Platinum or iZotope Music Production Suite) to cover all your template slots without breaking the bank.
Maintaining Your Template: The Audit Cycle
A template isn’t a set-and-forget tool. Schedule quarterly audits where you review which plugins you consistently bypass or replace during sessions. If you haven’t used a particular insert in 10 consecutive mixes, remove it. Templates should evolve with your skills and your ears — that’s exactly why Scheps updates his template periodically, stripping away what no longer serves the music.
Track your template versions. When you make significant changes, save a new version rather than overwriting. This way, you can always return to a previous configuration if a client requests a recall from six months ago.
Building a professional mix template takes an afternoon. But that single afternoon of setup work will save you hundreds of hours across the next year of mixing. Start with the bus routing, nail the gain staging, load your essential plugins in bypass, and organize everything with clear colors and labels. Your future self — and your clients — will thank you.
Need help building a custom mix template for your studio, or want a professional ear on your next mix? Sean Kim brings 28+ years of mixing and mastering experience.
Get weekly AI, music, and tech trends delivered to your inbox.


