
NVIDIA H200 Supply Update: 28+ Cloud Providers Now Offer HBM3e Instances — Here’s What It Costs in Q2 2025
April 25, 2025
4K Gaming PC Build 2025: Complete Component Guide Under $1500 (April)
April 25, 2025
Your drums hit hard in solo. Then you unmute the rest of the mix, and suddenly that punchy kick and cracking snare disappear into a wall of guitars and synths. I spent years fighting this exact problem before parallel compression drums techniques changed everything about how I approach a mix. If your drums keep vanishing the moment other elements come in, this guide will show you exactly how to fix it.
What Is Parallel Compression and Why Drums Need It
Parallel compression is the technique of blending a heavily compressed version of a signal with the original dry signal. Unlike traditional serial compression where your entire signal passes through the compressor, parallel compression lets you keep the natural dynamics of your drums while adding density, sustain, and power underneath.
The concept is simple: you send your drum bus to an auxiliary channel, crush it with aggressive compression settings, then blend that crushed signal back in at a lower level. The dry signal preserves your transients and natural feel. The compressed signal fills in the gaps between hits, bringing up the quieter details like ghost notes, room tone, and cymbal sustain. The result is drums that sound fuller and more powerful without losing their punch.
This is fundamentally different from just turning up the compressor on your drum bus. Serial compression forces you to choose between dynamics and density. Parallel compression gives you both. According to FabFilter’s compression guide, the key distinction is that parallel processing preserves the original signal path entirely, using the compressed version as an additive layer rather than a replacement.
The New York Compression Technique: History and Core Concept
Parallel compression is often called “New York compression” or the “NYC drum trick,” and for good reason. The technique was popularized by engineers working at Power Station studio in New York City during the 1980s. Engineers mixing records for artists like Bruce Springsteen, Madonna, and Tony Bongiovi developed the approach as a way to get radio-ready punch while maintaining the live energy of drum performances.
The original New York compression approach involved a specific twist beyond basic parallel compression: after the heavy compression stage, engineers would apply EQ to the compressed bus, typically boosting a low shelf around 100 Hz and a high shelf around 10 kHz. This EQ shaping on the compressed channel added weight in the low end and clarity on top, while the mid-range stayed controlled. The result was drums that felt massive and present without becoming harsh or boomy.
What made the technique revolutionary was its simplicity. On large-format analog consoles, engineers simply split the drum submix to two faders, patched a compressor on one, and rode the blend in real time during mixdown. There was no plugin, no special gear needed beyond a good compressor and a console with enough routing flexibility.
Step-by-Step: Setting Up Parallel Compression Drums in Your DAW
Let me walk you through the exact routing and settings to get parallel compression working on your drums. These steps apply to any modern DAW including Pro Tools, Logic Pro, Ableton Live, Studio One, and Cubase.
Step 1: Create Your Drum Bus
Route all your individual drum tracks (kick, snare, hi-hat, toms, overheads, room mics) to a single bus or aux track. This is your dry drum bus. Do your basic processing here first: EQ, gating, and any light bus compression you normally use. Get the drums sounding as good as you can before adding parallel compression.
Step 2: Create the Parallel Compression Bus
Create a new aux/return track and set up a send from your drum bus to this new channel. Set the send to pre-fader if you want the parallel compression level to remain consistent regardless of drum bus fader moves, or post-fader if you want it to follow your mix automation. Most engineers prefer post-fader for drums so the blend stays proportional.
Step 3: Compressor Settings for the Parallel Bus
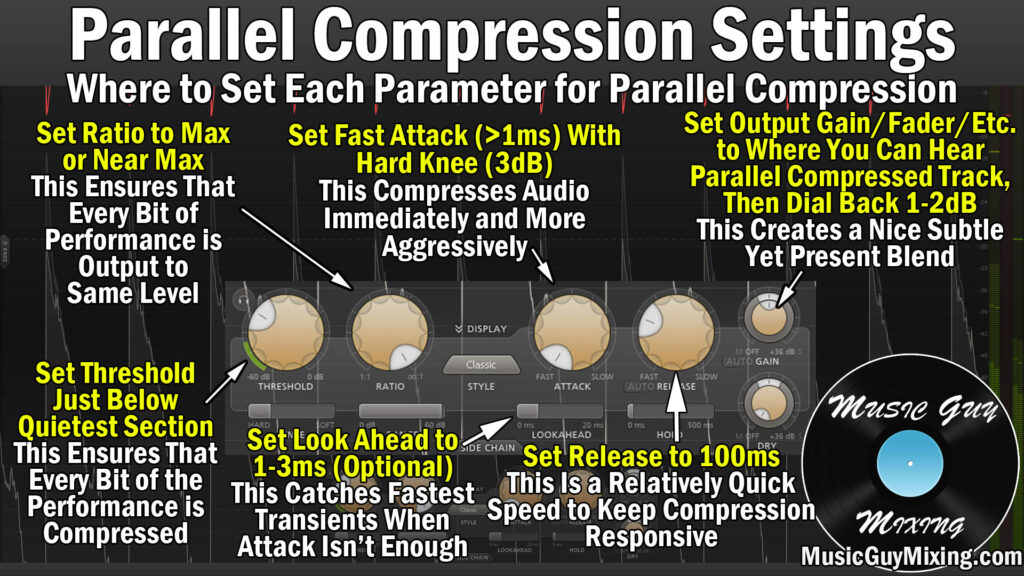
This is where the magic happens. Insert a compressor on your parallel bus and set it aggressively:
- Ratio: 8:1 to 12:1 (some engineers go all the way to limiting at 20:1)
- Attack: Fast, around 0.5-5 ms. You want the compressor grabbing transients immediately
- Release: Medium, around 50-150 ms. Fast enough to recover before the next hit, slow enough to smooth out sustain
- Threshold: Pull it down until you see 10-15 dB of gain reduction. This should be aggressive compression
- Makeup Gain: Bring the output level up to roughly match the input level
According to Waves Audio’s guide on NY compression, targeting around 10 dB of gain reduction with ratios between 8:1 and 12:1 is the sweet spot for drums. The compressed signal should sound over-compressed and almost unnatural on its own. That is completely normal and expected.
Step 4: Add EQ to the Compressed Bus (The NY Twist)
After the compressor, insert an EQ on the parallel bus. This is what separates New York compression from basic parallel compression:
- Low shelf boost: +3 to +6 dB at 100 Hz. This adds weight and body to your kick and toms
- High shelf boost: +2 to +4 dB at 10 kHz. This brings back the air and attack clarity that heavy compression dulls
- Optional mid cut: -2 to -3 dB around 300-500 Hz if the compressed bus sounds boxy or muddy
The EQ shapes the character of what you are blending in. By boosting the extremes, you add weight and sparkle without cluttering the midrange where vocals, guitars, and other elements compete for space.
Step 5: Blend the Parallel Bus
Start with the parallel bus fader all the way down. Slowly bring it up while listening to the full mix, not in solo. The typical starting blend ratio is 85-90% dry signal and 10-15% compressed signal. You should hear the drums get thicker and more present without obviously changing character. If you can clearly hear the compression working, you have probably blended in too much.

The Modern Shortcut: Using the Mix Knob
Most modern compressor plugins now include a “Mix” or “Dry/Wet” knob that lets you achieve parallel compression without any aux routing. Plugins from FabFilter, Waves, Universal Audio, and virtually every other developer include this feature. Simply insert the compressor directly on your drum bus, dial in aggressive settings, then turn the mix knob down to 10-20% wet.
This approach is faster to set up and easier to recall. However, the traditional aux send method has one significant advantage: you can process the compressed signal independently with EQ, saturation, or other effects before blending it back. With the mix knob approach, you are limited to whatever the compressor plugin itself offers.
For quick mixes or demos, the mix knob works great. For serious mix sessions where you want full control, set up the aux routing. Both methods produce valid results.
Advanced Parallel Compression Drums Techniques
Multiband Parallel Compression
Instead of compressing the full frequency range on your parallel bus, try using a multiband compressor. This lets you aggressively compress the low end (adding kick weight) and high end (adding snare crack) independently while leaving the midrange more natural. This approach is particularly effective for genres where the kick needs to be massive but the snare needs to cut through cleanly.
Parallel Compression on Individual Drums
While parallel compression on the full drum bus is the most common approach, you can also apply it to individual elements. A parallel compressed snare channel blended with the dry snare gives you that fat, sustained snare body without killing the initial crack. The same works for kick drum, where parallel compression can add chest-thumping low-end sustain without softening the beater attack.
Saturation on the Parallel Bus
Try adding a saturation or tape emulation plugin after the compressor on your parallel bus, before the EQ. This adds harmonic content and warmth that makes the compressed signal blend more naturally with the dry drums. Tape-style saturation works especially well because it gently rounds off the harshness that aggressive compression can create.
Common Mistakes to Avoid
After decades of mixing drums, I have seen these parallel compression mistakes come up again and again:
- Blending too much compressed signal: The most common error. If you can obviously hear the compression pumping, dial it back. Parallel compression should be felt more than heard
- Using too slow an attack: A slow attack on the parallel bus lets transients through the compressor, which defeats the purpose. You want the compressor catching everything so the dry signal handles the transients exclusively
- Ignoring phase alignment: Some compressors introduce latency. Check that your DAW’s delay compensation is active, or you will get phase cancellation between the dry and compressed signals that thins out your sound instead of fattening it
- Not listening in context: Always blend parallel compression while listening to the full mix. What sounds great in solo may not translate when every other element is playing
- Compressing already over-compressed drums: If your individual drum tracks are already heavily compressed, adding parallel compression on top will just create a dense, lifeless mess. Start with dynamic drum recordings for the best results
My Take: What 28 Years in Audio Taught Me About Parallel Compression
I have been mixing and producing for over 28 years now, and parallel compression is one of those techniques that fundamentally shifted how I think about drum processing. When I first learned it working on analog consoles in the early 2000s, it felt like discovering a cheat code. Suddenly, drums could sit in a dense mix without needing to be pushed absurdly loud.
What I have learned over the years is that the amount of parallel compression you need varies dramatically by genre and production style. For modern pop and hip-hop, I tend to use more aggressive settings with higher blend ratios, sometimes up to 25-30% wet. The genre demands that in-your-face drum presence. For acoustic or jazz-influenced work, I might only blend 5-8% of the compressed signal, just enough to add subtle sustain without losing the natural room feel.
One practical tip that took me years to figure out: try different compressors on your parallel bus depending on the vibe you want. An 1176-style FET compressor on the parallel bus gives you aggressive, punchy energy that works great for rock and pop. A VCA-style compressor like an SSL G-Bus gives you tighter, more controlled density. An optical compressor like an LA-2A produces smoother, more musical compression that blends almost invisibly. The compressor character matters as much as the settings because that character is what you are adding to your dry drums.
The biggest game-changer in my workflow was realizing that parallel compression is not just a mixing technique. I now sometimes set up parallel compression during tracking, printing a lightly blended version alongside the fully dry recording. This gives artists a more finished-sounding monitor mix during tracking without committing to heavy processing. It makes the session feel more professional and keeps the creative energy up.
Recommended Compressor Plugins for Parallel Drum Processing
You do not need expensive plugins to get great parallel compression results, but certain compressors excel at this application:
- FabFilter Pro-C 2: Clean, transparent, excellent visual feedback, built-in mix knob
- Waves CLA-76: Aggressive FET character, perfect for punchy rock and pop drums
- Universal Audio 1176 Collection: The gold standard FET compressor emulation
- SSL Native Bus Compressor: Tight, controlled VCA compression ideal for gluing
- Tokyo Dawn Labs Kotelnikov (Free): Outstanding free option with clean compression and mix knob
- Your DAW’s stock compressor: Seriously. The stock compressors in Logic, Pro Tools, Ableton, and Studio One all work perfectly well for parallel compression
The compressor you choose matters less than the technique. Master the routing, the settings, and the blending approach, and any decent compressor will give you excellent results.
Putting It All Together
Parallel compression drums processing is one of the most reliable techniques in any mix engineer’s toolkit. Whether you use the classic New York compression approach with EQ shaping, the modern mix-knob shortcut, or advanced multiband methods, the core principle stays the same: blend a heavily compressed signal with your dry drums to add density and power without sacrificing dynamics. Start with conservative blend levels, listen in the context of your full mix, and experiment with different compressor characters to find what works for your sound.
Looking for professional mixing, mastering, or Dolby Atmos services to take your drums and full mix to the next level?
Get weekly AI, music, and tech trends delivered to your inbox.


