
Vibe Coding for Non-Developers: How Ad Agencies Built Generative AI Workflows Without Code
March 12, 2026
GPT-5.4 vs Claude Opus 4: Which AI Model Actually Wins in 2026?
March 12, 2026
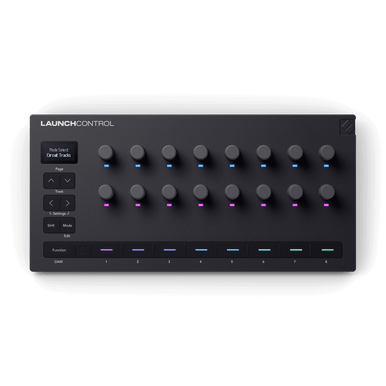
I unboxed the Novation Launch Control 3 on a Tuesday afternoon, and by Tuesday evening it was fully mapped, custom modes loaded, and running my entire Ableton session. That’s the promise of this $169.99 controller — and it actually delivers. Here’s exactly how to set it up, step by step.
What Is the Novation Launch Control 3?
Released in March 2026, the Novation Launch Control 3 is the third generation of Novation’s compact MIDI controller. It packs 16 endless rotary encoders, 8 assignable RGB buttons, an OLED display for real-time feedback, and both USB-C and 5-pin MIDI I/O into a desktop-friendly form factor. It’s designed for producers who want hands-on control without occupying half the desk.
Key specs at a glance:
- 16 endless rotary encoders with RGB status indicators
- 8 assignable buttons (Solo, Mute, Arm, Select, or custom)
- OLED display with real-time parameter feedback
- USB-C + 5-pin MIDI In, Out, Out2/Thru
- Up to 7 custom mode presets stored in hardware
- Deep integration: Ableton Live, Logic Pro, FL Studio, Cubase, Bitwig, Mackie HUI
- Includes Ableton Live 12 Lite, Cubase LE, and plugin bundle
Step 1: Connect and Install (Mac vs. Windows)
The first thing you need to know about the Novation Launch Control 3 setup is that the process differs by operating system.
On Mac
Connect via USB-C. That’s it — macOS uses Core MIDI natively and no additional driver installation is needed. Ableton Live 12 will auto-detect the controller immediately.
On Windows
Before connecting, download and install the Novation USB Driver from the official Novation downloads page. Once installed, connect the Launch Control 3 via USB-C. You’ll see two sets of MIDI ports appear — the DAW ports (Port 2, or MIDIIN2/MIDIOUT2) are the ones you want for DAW integration.
Step 2: Firmware Update via Novation Components
Before diving into your DAW, update the firmware. Open Novation Components (the browser-based editor at components.novationmusic.com) and connect your Launch Control 3. If a firmware update is available, you’ll be prompted on the Components hub page.
To start the update: press the Track Right Arrow button on the controller when prompted. The update takes under a minute. After completion, click Manage Launch Control 3 to proceed to the full editor.
Step 3: Ableton Live 12 Setup
This is where the magic happens. Ableton Live 12 auto-detects the Launch Control 3, but you’ll want to verify the configuration manually.
- Open Ableton Live 12 → Preferences → MIDI
- Under Control Surface, select Launch Control 3
- Set Input to the DAW port: Launch Control 3 (Port 2) on Mac or MIDIIN2 on Windows
- Set Output to the matching DAW output port
Once configured, the controller will display the currently controlled bank of tracks. You’ll see a blue hand icon appear in Ableton’s device rack — that’s the visual confirmation that DAW Control mode is active.
DAW Control Mode Encoder Mapping
In DAW Control mode, the 16 encoders map to the first 16 parameters of the selected device. Use the Page buttons to scroll through devices with more than 16 controls. Hold Shift + Page to move between multiple devices on a track. The top encoder rows handle device parameters; the third row controls Transport (scrub, zoom, playhead position).
Step 4: Button Modes — Arm, Mute, Solo, Select
The 8 assignable buttons operate in four modes that you can switch between on the fly:
- Arm: Buttons toggle record-arm on each track. Dim red = not armed, bright red = armed.
- Mute: Bright orange = active, dim yellow = muted. Instant mute/unmute per track.
- Select: Buttons select tracks for deeper device control. The selected track glows full brightness; others are dimmed.
- Custom: Assign any MIDI CC, note, program change, NRPN, or keystroke function.
Step 5: Create Custom Modes in Novation Components
This is where the Launch Control 3 separates itself from basic MIDI controllers. In Novation Components, you can create up to 7 custom modes stored directly in the hardware.
For each mode, configure:
- MIDI channel per encoder (1-16)
- CC number, min/max values, acceleration curves
- Button behavior: momentary or toggle
- On/off colors via the RGB indicator
- Message type: CC, Note, Program Change, NRPN, or Keystroke
A practical workflow: dedicate Mode 1 to Ableton DAW Control, Mode 2 to a custom plugin template (e.g., your go-to reverb or compressor), and Mode 3 to live performance macros. Save the configuration to the hardware and it’s there every time you plug in — no software required.
Step 6: MIDI Map Mode in Ableton (Custom Assignments)
For non-DAW-Control assignments, use Ableton’s built-in MIDI Map mode. Mode 8 on the Launch Control 3 comes pre-assigned with a default CC layout specifically for this purpose.
- Press MIDI Map Mode button in Ableton’s top right (turns orange)
- Click the parameter you want to control in Ableton
- Turn the knob on the Launch Control 3 — it maps instantly
- Press MIDI Map Mode again to exit
Save your Ableton set after mapping. For persistent mappings across sessions, save a template set that loads your Launch Control mappings automatically. This is the workflow pro producers use to shave minutes off every session start.
What’s in the Box: Included Software
The Launch Control 3 ships with a solid software bundle — more than enough to get producing on day one:
- Ableton Live 12 Lite — full DAW, limited tracks
- Cubase LE — alternative DAW option
- Klevgrand Fosfat — tape saturation plugin
- Baby Audio Parallel Aggressor — parallel compression tool
- Output Movement — rhythmic motion plugin
Register your device at novationmusic.com to unlock all included software licenses. The registration process also activates warranty support and gives you access to the Novation support portal with step-by-step guides for every DAW.
Troubleshooting Common Issues
Controller Not Detected in Ableton
Confirm you selected the DAW port (Port 2), not the user port. On Windows, check Device Manager to ensure the Novation USB driver is installed and the device shows no errors.
Encoders Jumping Values
This is usually an acceleration curve issue. In Novation Components, reduce the encoder acceleration for that mode. Setting it to a lower sensitivity gives you finer control for parameters like filter cutoff.
Custom Modes Not Saving
After editing in Components, make sure to click Send to Hardware — not just Save to File. The hardware stores up to 7 modes independently of your computer.
Step 4: Advanced Mapping and Custom Mode Creation
Once you’ve got basic connectivity sorted, the real power of the Launch Control 3 comes from custom mapping. The Components editor lets you create up to 7 custom modes, each with completely different encoder and button assignments.
Creating Your First Custom Mode
In Components, click the Mode dropdown and select Add New Mode. Name it something descriptive like “Mix Session” or “Creative FX.” For each encoder, you can assign specific MIDI CC values, set scaling curves, and even configure RGB color feedback to match your workflow.
Here’s a proven mapping setup I use for mixing sessions:
- Encoders 1-8: Track volumes (CC 7) for channels 1-8
- Encoders 9-16: Send levels (CC 91-94) for reverb, delay, chorus, distortion
- Buttons 1-8: Track mute toggles with red LED feedback
The scaling curves are particularly useful. Set linear scaling for volume controls but logarithmic for frequency-based parameters like filter cutoffs. This gives you more precise control where you need it most.
Hardware Mode Switching
To switch between modes without touching your computer, hold the Device button and press any numbered encoder (1-7). The OLED display shows which mode is active, and the RGB rings shift colors immediately to match your custom assignments.
DAW-Specific Integration Beyond Ableton
While Ableton Live gets the spotlight, the Launch Control 3 works exceptionally well with other major DAWs. Each requires slightly different setup approaches.
Logic Pro Setup
In Logic Pro, go to Preferences > Control Surfaces > Setup and click the plus icon. Select Novation Launch Control XL from the manufacturer dropdown (yes, XL — Logic doesn’t have a specific LC3 preset, but the XL mapping works perfectly). Set the MIDI Input/Output to your Launch Control 3 ports.
The immediate benefit: Logic’s Channel EQ automatically maps to encoders 1-8, while the Compressor maps to encoders 9-12. This gives you instant hands-on mixing without any manual MIDI learn process.
FL Studio Configuration
FL Studio’s approach is more manual but ultimately more flexible. Open Options > MIDI Settings, find your Launch Control 3 input, and set the controller type to Generic Controller. Enable both “Send master sync” and “Enable” checkboxes.
For optimal workflow, right-click any mixer parameter and select Link to controller. Twist the desired encoder on the Launch Control 3, and FL Studio instantly creates the connection. The RGB feedback works immediately, showing parameter positions in real-time.
Troubleshooting Common Setup Issues
After setting up dozens of Launch Control 3 units in various studio environments, certain issues pop up repeatedly. Here’s how to solve the most common ones.
Windows Driver Conflicts
If Windows shows the controller as connected but your DAW doesn’t see it, check Device Manager for driver conflicts. Look under “Sound, video and game controllers” for any entries with yellow warning triangles. Uninstall the conflicted driver, disconnect the Launch Control 3, reinstall the official Novation driver, then reconnect.
Pro tip: If you’re running multiple MIDI interfaces, Windows sometimes assigns conflicting port numbers. Use a powered USB hub to maintain consistent USB enumeration order.
MIDI Feedback Loops
RGB encoder feedback can create MIDI loops if you’ve enabled bidirectional communication incorrectly. In your DAW’s MIDI preferences, ensure the Launch Control 3 output is enabled for the control surface but disabled for MIDI tracks. This prevents note and CC data from creating feedback cycles.
Components Browser Compatibility
The Components editor requires WebMIDI support, which isn’t available in all browsers. Chrome and Edge work reliably. Firefox requires the dom.webaudio.enabled flag to be set to true in about:config. Safari on macOS works but can be temperamental with USB hubs.
If Components fails to detect your controller, try a different USB port or disable browser extensions temporarily. AdBlockers sometimes interfere with WebMIDI initialization.
Real-World Performance and Workflow Integration
After three months of daily use across multiple projects, the Launch Control 3 has fundamentally changed how I approach mixing and sound design. The immediate tactile feedback eliminates the constant mouse-reaching that breaks creative flow.
Studio vs. Live Performance
In the studio, I keep Mode 1 mapped to mixer functions and Mode 2 dedicated to the currently selected plugin. For live performance, Mode 3 becomes my “safety” preset — master volume, tempo nudge, and kill switches for emergencies.
The USB-C connection is rock solid, but for critical live situations, I always run a backup 5-pin MIDI cable to a secondary interface. The Launch Control 3’s dual MIDI outputs make this seamless — one output to the main computer, one to a backup laptop running identical project files.
Integration with Existing Control Surfaces
The Launch Control 3 doesn’t compete with larger control surfaces — it complements them. Paired with an Ableton Push or NI Maschine, it handles the precision parameter tweaking while the larger controller focuses on note input and high-level arrangement. This division of labor is incredibly efficient once you develop muscle memory for each device’s role.
The compact footprint means it fits comfortably between a keyboard and Push without crowding. At 7.2 inches wide and 4.3 inches deep, it occupies less desk space than most audio interfaces while providing significantly more hands-on control than software-only workflows.
Ready to take your studio setup further? Whether you’re building a production rig from scratch or upgrading your gear, Greit Studios can help you design a workflow that actually fits how you work.