AI Writing Tools October 2025: Jasper vs Copy.ai vs Writer vs Claude — Which Platform Actually Delivers
October 17, 2025
Samsung Odyssey OLED G8 32-Inch Review: Is This $999 4K 240Hz QD-OLED Monitor Worth It?
October 17, 2025
“The low end is too boomy, but when I slap a compressor on the master bus, it kills the high-end sparkle.” Sound familiar? After 28 years of mastering thousands of tracks, I can tell you that multiband compression mastering is the precise answer to this exact problem — and most engineers are barely scratching the surface of what it can do.
The truth is, most people default to scrolling through presets and hoping for the best. Today, I’m sharing the exact parameter values I use across 5 real-world mastering scenarios — no guesswork, no “use your ears” cop-outs (well, maybe a little of that at the end).
What Is Multiband Compression? The Core Difference from Standard Compression
A standard full-band compressor treats the entire frequency spectrum as one signal. When the kick drum crosses the threshold, everything — vocals, hi-hats, guitars — gets compressed along with it. This is what causes the dreaded “pumping” effect in mastering.
Multiband compression mastering splits the audio signal into separate frequency bands, each with independent compression controls. When that kick pushes too hard, only the low-frequency band gets compressed while the mid-range vocals and high-frequency cymbals remain untouched. As Sound On Sound puts it, the key principle is to “use the minimum number of bands required to solve the problem.”
Dynamic EQ vs Multiband Compression: When to Use Which
Dynamic EQ targets specific frequency points with surgical precision. Multiband compression handles entire frequency ranges. If you’re dealing with a single resonant frequency that occasionally pokes out, dynamic EQ is more precise. But when you need to manage the overall energy of an entire frequency range — like controlling the entire low end or taming overall brightness — multiband compression is the right tool.
Where Multiband Compression Sits in the Mastering Chain
In a typical mastering chain, the multiband compressor goes after EQ and before the limiter. But this isn’t a hard rule. Here’s the signal flow I use as a starting point in most sessions:
- Linear Phase EQ (surgical problem-solving)
- Full-band Compressor (glue, 1-2dB gain reduction)
- Multiband Compressor (frequency-specific problem solving)
- Saturation/Tape Emulation (optional)
- Limiter (final loudness)
The critical mindset: treat multiband compression as a problem-solving tool, not a default insert. It goes on the chain only when full-band compression can’t address a specific frequency-domain issue.
Crossover Frequency Setup: 3-Band vs 4-Band Strategy
In my experience, 2-3 bands are sufficient over 90% of the time. If you find yourself reaching for 4+ bands, it’s usually a sign that the mix itself needs revision. As Adam Kagan noted in his Sonarworks mastering guide, “with great power comes great responsibility” — and multiband processors can create unwanted artifacts when overused.
Recommended Crossover Points
2-band setup (most common): Crossover at 120-200Hz. Separates low end from everything else. Optimal for kick/bass problems.
3-band setup: Low crossover at 150Hz, high crossover at 5-6kHz. Independent control over lows, mids, and highs. Ideal for simultaneous vocal prominence + low-end excess issues.
4-band setup (use cautiously): 80Hz / 250Hz / 5kHz. Separates sub-bass, bass, mids, and highs. Reserved for complex electronic music or orchestral mixes.
For crossover slopes, aim for 18dB/octave or steeper. According to Sound On Sound, lower slopes create more overlap between bands — more natural sounding but less precise. Steeper slopes provide better isolation but can sound artificial if pushed too far.
5 Real-World Multiband Compression Mastering Scenarios with Exact Settings
Scenario 1: Kick Drum Causing Excessive Pumping
The most common problem in mastering. A full-band compressor causes the entire mix to duck every time the kick hits.
- Bands: 2 bands (crossover at 150Hz)
- Low band: Ratio 1.3:1, Attack 70-100ms, Release 100ms
- Gain reduction target: 1-2dB on the high-frequency band
- Key insight: Keep attack above 40ms to preserve drum punch and transient impact
Scenario 2: Vocals Poking Out in Certain Sections
The chorus vocal suddenly jumps out of the mix. Full-band compression can’t isolate it.
- Bands: 3 bands (active mid-band: 250Hz-5kHz)
- Mid band: Ratio 1.5:1, Attack 30-50ms, Release 100-200ms
- Gain reduction target: 2-3dB on loud passages, 1dB on soft passages
- Key insight: Only activate the mid band — bypass low and high bands entirely
Scenario 3: Sibilance and High-End Harshness
When sibilance issues persist into the mastering stage, multiband compression handles a broader frequency range more naturally than a de-esser.
- Bands: 2-3 bands (target 2-8kHz)
- High band: Ratio 10:1, Attack <5ms, Release ~25ms
- Gain reduction target: Set threshold high so compression only engages on harsh peaks
- Key insight: High ratio + high threshold = catches only the peaks, passes everything else through
Scenario 4: 808-Heavy Hip-Hop/Electronic Mixes
The sustained 808 bass dominates the entire mix’s dynamics, making everything else feel lifeless.
- Bands: 2 bands (crossover at 100-120Hz)
- Low band: Ratio 2:1, Attack 10-20ms
- Release: Tempo-synced — calculate using 60,000 ÷ BPM = quarter-note duration in milliseconds
- Key insight: Syncing release to the tempo makes the bass breathe rhythmically with the beat
Scenario 5: Inconsistent Brightness in Pop/Rock Mixes
Acoustic guitar picks, cymbal hits, or string scrapes create unpredictable high-frequency spikes.
- Bands: 2 bands (crossover at 6kHz)
- High band: Ratio 5:1+, Attack <1ms (very fast)
- Gain reduction target: 12dB+ (aggressive taming is acceptable here)
- Key insight: As Sound On Sound recommends, use the uppermost band with very fast attack times for transient smoothing
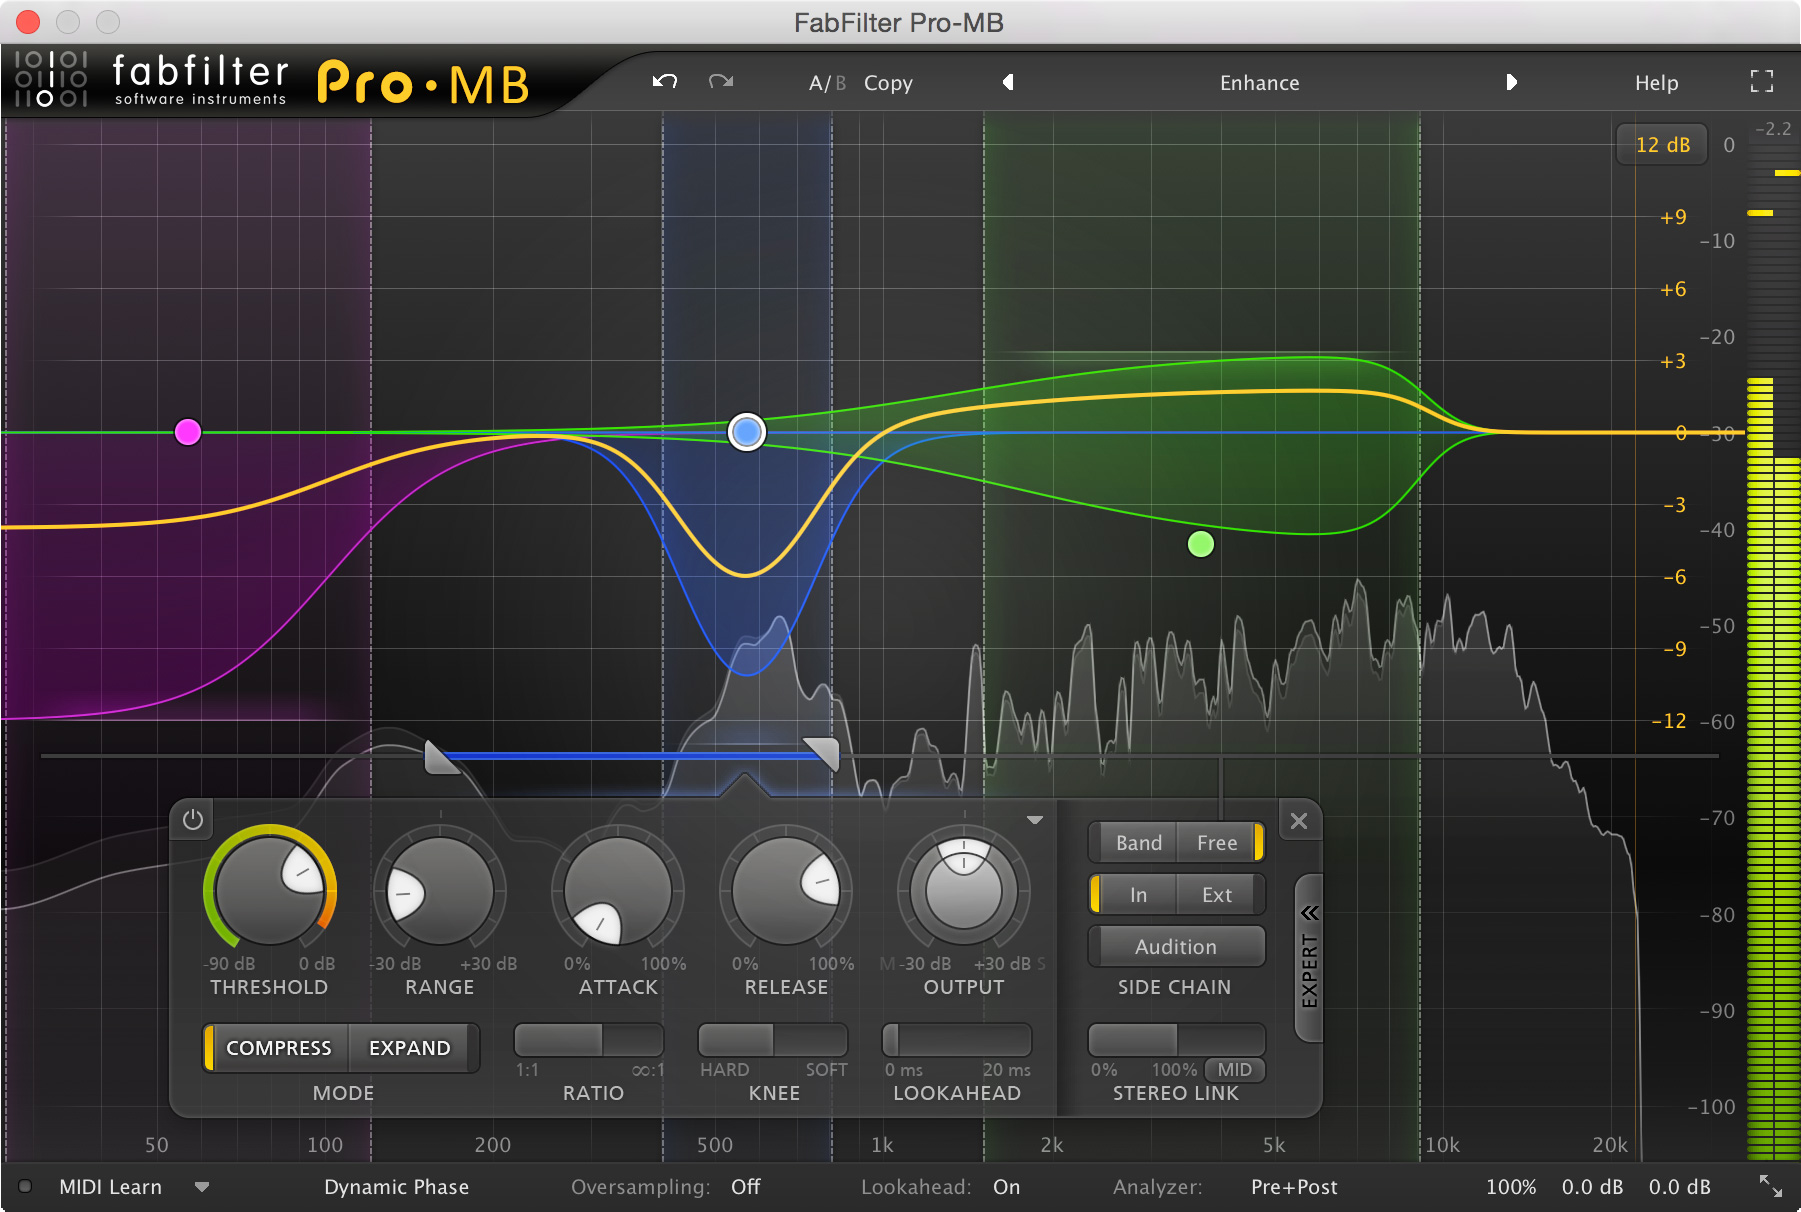
FabFilter Pro-MB vs iZotope Ozone: Which Multiband Compressor Should You Choose?
As of October 2025, the two heavyweight contenders for mastering-grade multiband compression are FabFilter Pro-MB and the multiband module inside iZotope Ozone.
FabFilter Pro-MB strengths: Up to 6 bands, create bands at any frequency range without traditional crossovers, Dynamic Phase mode for minimal phase distortion, independent Mid/Side processing per band. Its intuitive interface makes for a fast, visual workflow.
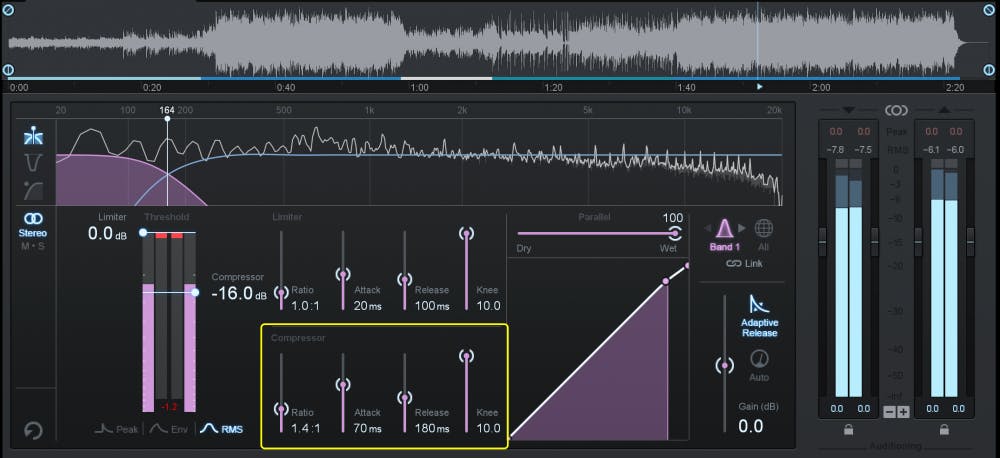
iZotope Ozone strengths: AI-powered mastering assistant suggests starting settings, complete mastering chain in a single plugin (EQ, compression, imaging, limiting), and tight integration between modules. If you want a one-stop mastering environment, Ozone is hard to beat.
My recommendation: if you want to go deep on multiband compression specifically, Pro-MB’s flexible band system is more powerful and intuitive. If you want to manage your entire mastering chain in one place, Ozone is more practical. And if you’re starting out and want to experiment for free, Xfer OTT is always the right answer — especially if you’re looking for that aggressive, hyped multiband sound.
5 Common Mistakes to Avoid — Skip These and You’re Halfway There
- Activating all bands simultaneously: Even unused bands introduce phase changes and distortion. Only activate the bands you actually need.
- Inconsistent ratios across bands: If one band is set to 4:1 while others are at 1.5:1, you’ll create tonal imbalances. As Waves Audio recommends, keep ratios similar across bands.
- Skipping A/B comparison: Multiband processing creates subtle cumulative changes. Always bypass and compare to the original.
- Using too many bands: If you’re reaching for 4+ bands, the mix itself probably needs fixing. Go back to the mixing stage.
- Ignoring attack times: Keep at least 5-10ms attack in mastering to preserve transient punch. Except for sibilance control, ultra-fast attack times will kill the life in most masters.
Final Thoughts: Multiband Compression Is a Scalpel, Not a Hammer
After 28 years of mastering, the single most important principle I can share about multiband compression mastering is this: less is more. It’s not a default insert on every session — it’s a surgical tool you reach for when a specific frequency-range problem is clearly identified. Use the 5 scenarios above as starting points, but always let your ears make the final call.
Need professional mixing & mastering, or want a 1-on-1 consultation on dialing in your multiband compression settings?
Get weekly AI, music, and tech trends delivered to your inbox.


