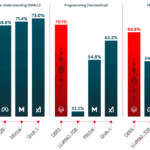
Databricks DBRX: How 36B Active Parameters Beat 70B Dense Models — One Year Later
May 28, 2025
Intel Lunar Lake Laptop Roundup: 5 Efficiency Champions That Finally Make x86 Competitive
May 28, 2025
Your mix sounds great in solo. Every track is punchy, bright, and full. Then you hit play on the full session and it sounds like a muddy, lifeless wall of noise. If that scenario feels painfully familiar, you are not alone — and these five mixing mistakes beginners make are almost certainly the reason why.
After 28 years of mixing records and running sessions at Greit Studios, I have heard these same errors thousands of times. The good news? Every single one of them is fixable once you understand what is actually going wrong. Let me walk you through the five most common EQ and compression mistakes that are holding your mixes back — and exactly how to fix each one.
Mistake 1: Over-Boosting EQ Instead of Cutting — The #1 Mixing Mistake Beginners Make
Here is the instinct every beginner has: something does not sound bright enough, so you boost 10kHz. The bass feels weak, so you boost 80Hz. The vocal is lost, so you boost 3kHz. Before you know it, every single track has three or four boosts, and your mix sounds harsh, bloated, and fatiguing.
This is what iZotope calls EQ creep — as your ears adapt to the boosted frequencies, you keep adding more until the mix sounds completely unnatural. The problem compounds across tracks: if you boost 3kHz on the vocal, the guitar, the snare, and the synth pad, that frequency range becomes a harsh, fatiguing pileup.
The Fix: Think Subtractive First
Instead of boosting what you want to hear more of, cut what is masking it. Want the vocal to sound brighter? Try cutting 300-500Hz of mud instead of boosting the highs. Need the kick drum to punch through? Cut the low-mids on the bass guitar rather than boosting the kick’s attack. Subtractive EQ creates space without adding energy, and your master bus will thank you for it.
A practical approach: grab a narrow-bandwidth EQ band, boost it by 10dB, and sweep across the frequency range. When you hit a spot that sounds especially unpleasant, that is your problem frequency. Now cut it by 2-4dB with a moderate Q. This sweep-and-cut technique is one of the most reliable mixing tools you will ever learn.
Mistake 2: EQing in Solo Mode — Losing the Mix Context
Solo mode is seductive. You press S on a track, and suddenly you can hear every detail — the breathiness of the vocal, the body of the snare, the sub-harmonics of the bass. So you start EQing, making each track sound perfect in isolation. The problem? A mix is not a collection of individually perfect tracks. It is a single, cohesive sonic picture.
According to Sound On Sound’s analysis of over 21,000 student mixes at HOFA-College, frequency balance issues — largely caused by EQing out of context — are one of the top five mixing problems they encounter. When you EQ in solo, every track sounds forward and present because there is nothing else competing for attention. But in the full mix, all that presence creates a cluttered, unfocused sound.
The Fix: EQ With the Mix Playing
Make your EQ decisions with all tracks playing. If you need to solo a track briefly to identify a specific problem frequency, do it — but always switch back to the full mix before committing to any move. Ask yourself: “Does this EQ change make the overall mix sound better, or just this one track?” That distinction is everything.
One technique I use constantly: toggle the EQ bypass while listening to the full mix. If the mix sounds better with the EQ engaged, keep it. If you cannot tell the difference in context, you probably do not need that EQ move at all.
Mistake 3: Wrong Compression Attack and Release Settings — Killing Transients or Causing Pumping
Compression is where beginners really get into trouble, because the controls feel abstract until you develop the ear for them. The two most destructive mistakes happen at opposite ends of the attack and release spectrum.
Too-fast attack time catches the initial transient of every note and clamps it down. As iZotope’s compression guide puts it, your snare drum ends up sounding like a sack of cement instead of a sharp, defined hit. The same thing happens to acoustic guitars, piano, and any instrument that relies on its attack to cut through a mix.
Too-slow release time means the compressor never fully recovers before the next transient arrives. The result is a pumping, breathing effect that pushes elements unnaturally into the background and brings up noise between notes. On bus compression, a miscalibrated release can make your entire mix feel like it is gasping for air.

The Fix: Match Attack and Release to the Musical Content
For drums and percussive elements, start with a medium attack (10-30ms) to let the transient through, then adjust. If the drum sounds dull, slow the attack down. If it is poking out too aggressively, speed it up slightly. For release, time it so the compressor recovers just before the next hit — watch the gain reduction meter and aim for it to return to zero between beats.
For vocals and sustained instruments, a faster attack with a moderate release usually works well. The key is listening: compress, then bypass, then compress again. If the compressed version sounds smaller and less alive than the original, your settings are too aggressive. Compression should make things sit better in the mix, not make them sound worse.
Mistake 4: Over-Compression — Squashing the Life Out of Your Mix
There is a dangerous misconception that compression makes things louder. It does not — it makes things quieter. A compressor reduces the level of signals that exceed the threshold. Yes, you can use makeup gain afterward, but the actual process is one of reduction, not amplification. When beginners do not understand this, they pile on compression trying to get “louder” and end up with a flat, lifeless mix that has no dynamic range.
Over-compression across multiple channels is especially insidious because it happens gradually. Each individual compressor might only be doing 3-4dB of reduction, which sounds fine in isolation. But when every track in a 40-track session is compressed by 3-4dB, the cumulative effect slowly sucks the energy and excitement out of the music. As MusicRadar’s compression guide suggests, a good approach is using multiple compressors for subtle processing rather than extreme compression with one.
The Fix: Compress With Purpose, Not by Default
Before you reach for a compressor, ask yourself: what is the problem I am solving? If a vocal performance has huge dynamic swings between whispered verses and belted choruses, compression makes sense. If a bass guitar has inconsistent note levels, compression helps. But if a track already sits well in the mix at a consistent level, adding compression “because you are supposed to” just damages the sound.
A rule of thumb I have used for decades: if you are compressing more than 6dB of gain reduction on individual tracks, you are almost certainly overdoing it. For most mixing applications, 2-4dB of gain reduction is the sweet spot. Save heavier compression for deliberate creative effects — parallel compression on drums, heavy limiting on a specific synth sound — where you are making an intentional sonic choice, not just defaulting to “compress everything.”
Mistake 5: Ignoring Gain Staging — The Foundation Most Beginners Skip
This is the mistake that makes every other mistake worse. If your gain staging is wrong, your EQ and compression plugins are not operating in their optimal range, your mix bus is clipping before you even start mixing, and every decision you make is based on inaccurate information.
Gain staging means setting the signal level at each point in the chain so that every plugin receives signal at the level it was designed for. Most analog-modeled plugins — and that includes the vast majority of EQs and compressors in your DAW — are designed to operate with signals peaking around -18dBFS to -12dBFS. Feed them a signal that is already peaking at 0dBFS, and they will distort, behave unpredictably, or at minimum sound different than intended.
According to Sound On Sound’s research, proper gain staging means individual tracks should sit around -18dBFS, with the master output peaking below -3.0dBFS before any mastering processing. Point Blank Music School echoes this, noting that overloading the master bus with hot signals leads to distortion, muddy mixes, and loss of clarity.
The Fix: Set Your Levels Before You Mix
Before you add a single plugin, pull all your faders down and bring them up one by one until each track peaks around -18dBFS during its loudest section. Use a VU meter plugin on your master bus and aim for an average level around -18dBFS there as well. This gives your plugins the headroom they need and gives you the headroom you need on the master bus for a clean mixdown.
If a recorded track is way too hot, use a gain/trim plugin as the first insert to bring it down before it hits your EQ and compressor chain. This one simple step — spending five minutes on gain staging before you start mixing — will make every subsequent mixing decision more accurate and effective.
Avoid These Mixing Mistakes Beginners Make: Your Complete Checklist
These five mixing mistakes beginners make are interconnected. Poor gain staging feeds into over-compression, which feeds into over-EQing, which gets worse when you are working in solo mode. Fix the foundation — gain staging and monitoring context — and the EQ and compression mistakes become much easier to avoid.
- Start every session with proper gain staging (-18dBFS per track)
- Make EQ decisions in context, not in solo
- Cut before you boost — subtractive EQ first
- Compress with a specific purpose, not by default
- Match attack and release to the musical content
- Take breaks every 45-60 minutes to combat ear fatigue
- Reference your mix against professional tracks in the same genre
The difference between an amateur mix and a professional one is rarely about expensive plugins or perfect acoustic treatment. It is about avoiding these fundamental mistakes and building your decisions on a solid technical foundation. Master these five corrections, and your mixes will immediately sound cleaner, more balanced, and more professional.
If you have been making these errors, do not feel bad — every professional engineer went through the same learning curve. The fact that you are identifying and fixing these habits now puts you ahead of most home studio producers who never question their process. Keep mixing, keep listening critically, and keep referencing.
Want help getting your mixes to the next level? Whether you need professional mixing, mastering, or guidance on setting up your studio workflow, Sean Kim and the Greit Studios team are here to help.
Get weekly AI, music, and tech trends delivered to your inbox.


