
AI Art Copyright Showdown: Jason Allen Takes the US Copyright Office to Federal Court
August 27, 2025
Google Nest Cam Outdoor 2025 Leaked: 2K HDR, 6x Zoom, and Gemini AI Transform Home Security
August 27, 2025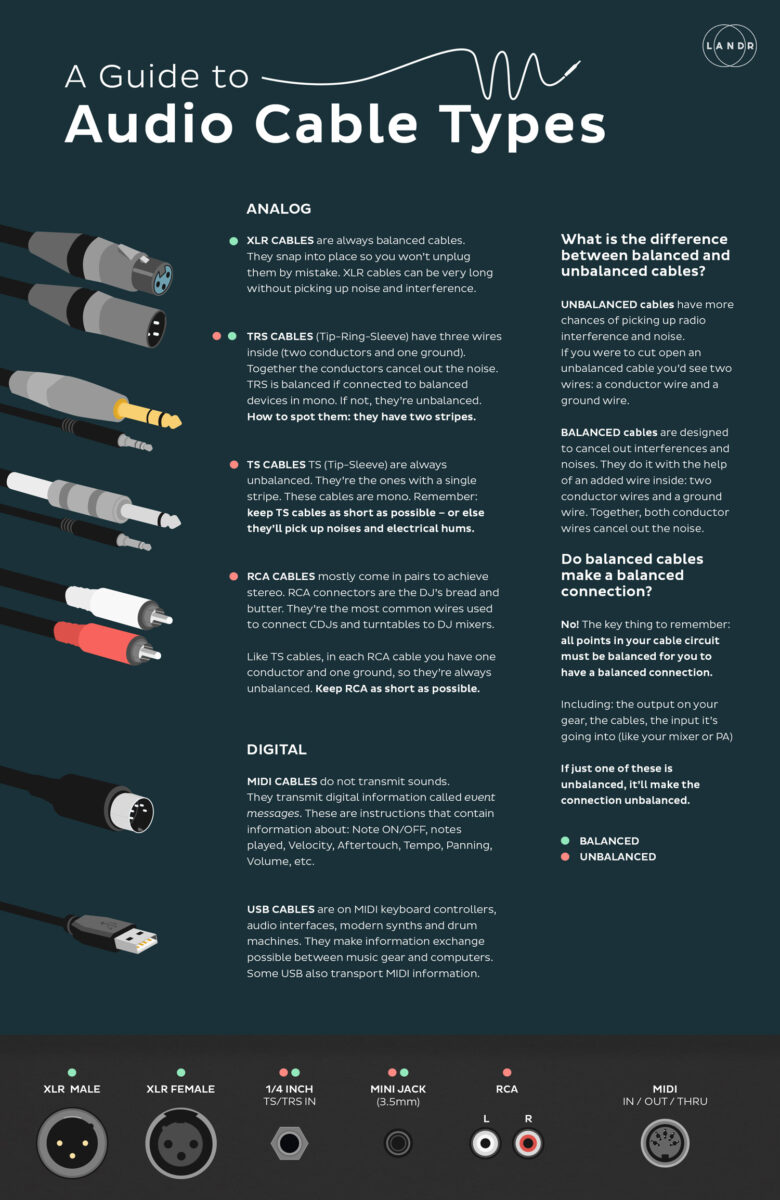
I’ve watched people blow $300 on a pristine condenser microphone, plug it into their interface with a random cable from a junk drawer, and then wonder why their recordings sound like they’re broadcasting from inside a washing machine. After 28 years in the audio industry, I can tell you this: cables are where most home studios quietly fall apart — and it’s the easiest problem to fix once you understand three letters: XLR, TRS, and TS.
This audio cable guide to XLR TRS TS connectors will give you everything you need to wire your studio correctly the first time. No more guessing, no more hum, no more “why does my left monitor sound different from my right.”
The Big Three: XLR, TRS, and TS Audio Cables Explained
Every cable in your studio does one job: carry an audio signal from point A to point B. The difference lies in how they carry that signal — and that difference determines whether you get clean audio or a buzz-riddled mess.
XLR: The Professional Standard
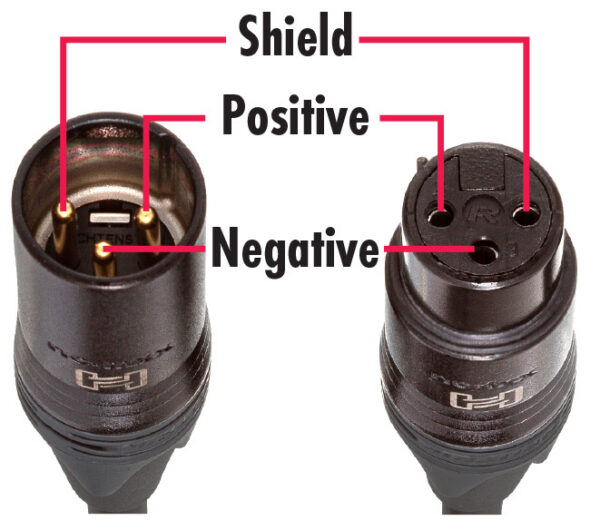
XLR cables are the workhorses of professional audio. You’ll recognize them by their distinctive round, three-pin connectors that click and lock into place. That locking mechanism isn’t just convenient — it’s a lifesaver on stage and in the studio where accidental disconnections can ruin a take or a live performance.
Inside an XLR cable, three wires carry the signal: pin 1 for ground, pin 2 for hot (positive), and pin 3 for cold (negative). This three-wire design makes XLR a balanced cable, which means it actively rejects noise through a clever physics trick called common-mode rejection. Any electromagnetic interference that sneaks into the cable affects both the hot and cold wires equally — and when the receiving device flips the cold signal and combines it with the hot, that noise cancels itself out. The result? Clean signal even over cable runs of several hundred feet.
When to use XLR:
- Microphones (dynamic, condenser, ribbon) — this is non-negotiable
- Studio monitor connections when both your interface and monitors have XLR I/O
- Any cable run longer than 15–20 feet
- Live sound — PA systems, stage boxes, FOH connections
- Outboard gear with XLR inputs/outputs (compressors, preamps, EQs)
TRS: The Versatile Middle Ground
TRS stands for Tip-Ring-Sleeve, referring to the three sections on the 1/4-inch (6.35mm) connector separated by two black insulating bands. As LANDR’s cable guide aptly puts it, TRS cables are the “chameleons” of the audio world — they can carry either a balanced mono signal or an unbalanced stereo signal, depending on how they’re wired and what they’re plugged into.
In balanced mode (most common in studios), the tip carries hot, the ring carries cold, and the sleeve carries ground — exactly like XLR, just in a different physical format. This means a 1/4-inch TRS cable gives you the same noise rejection as XLR when used for balanced connections.
In stereo mode (headphones, aux sends), the tip carries left audio, the ring carries right audio, and the sleeve is the shared ground.
When to use TRS:
- Studio monitor connections (most audio interfaces output balanced TRS)
- Headphone connections (stereo TRS)
- Insert cables on mixing consoles (TRS Y-cables: tip = send, ring = return)
- Balanced connections to outboard gear with 1/4-inch jacks
- Connecting your interface outputs to monitor controller inputs

TS: The Instrument Cable
TS stands for Tip-Sleeve — just two conductors, no ring. You can visually tell a TS cable apart from TRS by counting the black bands on the connector: TS has one band, TRS has two. This simplicity means TS cables are unbalanced: one wire for the signal, one wire for the ground, and no noise cancellation mechanism.
Does that mean TS cables are bad? Absolutely not. They’re designed for a specific purpose and they do it well — as long as you respect their limitations.
When to use TS:
- Electric guitar and bass to amp or pedalboard
- Guitar pedal interconnects
- Synthesizers and keyboards with unbalanced outputs
- Short cable runs (under 15–20 feet) where noise isn’t a concern
- Line-level connections between gear that only has TS jacks
Balanced vs. Unbalanced: Why It Actually Matters
This is where most beginners’ eyes glaze over, but I promise this is simpler than it sounds — and understanding it will save you hours of troubleshooting mysterious hum and buzz.
Unbalanced cables (TS, RCA) use two conductors: signal and ground. The ground wire also acts as a shield against interference. The problem? That shield isn’t perfect. The longer the cable, the more it acts like an antenna, picking up electromagnetic interference from power cables, dimmer switches, computer monitors, and every other electrical device in your room. According to Hosa Technology, unbalanced cables should stay under 15–20 feet to avoid audible noise problems.
Balanced cables (XLR, TRS) use three conductors. The signal is sent on two wires as mirror images of each other (opposite polarity). When the signal reaches the receiving device, the cold signal is flipped and combined with the hot signal. Any noise picked up along the way — which appears identically on both wires — cancels itself out. This is common-mode rejection, and it’s the reason professional studios and live venues run XLR cables over hundreds of feet with zero noise.
Here’s the practical takeaway: if your cable run is under 6 feet, you probably won’t hear a difference between balanced and unbalanced. But once you start stretching cables across a room — say, from your desk to monitors on stands, or from a wall panel to a mic in a vocal booth — balanced cables become essential.
Cable Length: The Silent Quality Killer
Cable length matters more than most people think, especially with unbalanced connections. Here’s a straightforward guideline I’ve used across countless studio builds:
- Under 6 feet / 2 meters: TS or TRS — either works fine. Signal degradation and noise pickup are negligible at this distance.
- 6–20 feet / 2–6 meters: TRS (balanced) preferred. TS will likely still work in a quiet environment, but you’re pushing the envelope.
- Over 20 feet / 6 meters: Balanced only (XLR or TRS). Running unbalanced cables at this length is asking for trouble — especially near power cables, lighting rigs, or computer equipment.
- Over 50 feet / 15 meters: XLR strongly recommended. The locking connectors prevent accidental disconnections, and XLR infrastructure is the industry standard for long runs.
A tip from decades of studio wiring: always buy cables slightly longer than you think you need. A cable that’s too short forces awkward routing that creates tension on connectors and makes reconfiguration a nightmare. An extra 2–3 feet of slack is always worth it.
Common Studio Scenarios: The Right Cable for the Job
Theory is great, but let’s get practical. Here’s how I’d cable up the most common studio setups:
Bedroom Producer Setup
Audio interface → studio monitors: TRS to TRS (balanced 1/4-inch). Most interfaces like the Focusrite Scarlett series, Universal Audio Volt, or Audient iD series have balanced TRS outputs. Your monitors (Yamaha HS5/HS7, KRK Rokit, Adam Audio T-series) typically accept both TRS and XLR. TRS is the most practical choice here because the cable runs are short (usually 3–6 feet) and TRS cables are cheaper and easier to route than XLR.
Microphone → interface: XLR to XLR. Always. Even if it’s a $50 dynamic mic on a 3-foot cable, use XLR. Microphones output extremely low-level signals that are highly susceptible to interference, and condenser microphones need phantom power (+48V), which is delivered through the XLR cable.
Guitar → interface: TS to TS (standard instrument cable). Plug into the Hi-Z or instrument input on your interface. Keep the cable under 15 feet for best results.
Professional Studio Setup
In a professional environment, XLR dominates. Microphones, outboard preamps, compressors, and patch bays are typically interconnected with XLR for maximum noise rejection over longer cable runs. A well-designed studio will have a structured cabling system where XLR runs through wall plates and conduit from the live room to the control room — sometimes 50 feet or more.
TRS comes into play for patch bays (TT or 1/4-inch), insert points on consoles, and connections between closely spaced outboard gear. Some engineers prefer TRS for monitor connections even when XLR is available, simply because the smaller connectors are easier to manage in tight rack spaces.
Live Performance Setup
On stage, XLR is king. The locking connectors prevent accidental disconnections when performers move around or cables get stepped on. All microphones run XLR to the stage box, which then sends balanced signals through a snake (multi-channel XLR bundle) to the front-of-house console. Guitar and bass players use TS cables to their amps or pedalboards, with a DI box converting the unbalanced signal to balanced XLR for the long run to the mixing board.
The DI Box: Bridging Unbalanced and Balanced Worlds
If you’ve ever plugged a guitar directly into a mixing console with a long TS cable, you’ve probably experienced the hum and buzz that comes with running unbalanced signals over distance. The solution is a DI (Direct Injection) box.
A DI box takes an unbalanced TS input and converts it to a balanced XLR output. It also typically provides impedance matching and a ground lift switch to eliminate ground loop hum. Whether you’re recording bass guitar directly into your interface or sending a keyboard signal to a PA system 100 feet away, a DI box is your best friend.
Active DI boxes (powered by battery or phantom power) work better with passive pickups (like most electric guitars), while passive DI boxes handle high-output sources like keyboards and active basses with ease.
Cable Quality: What Actually Matters (and What Doesn’t)
Let me be honest with you: the “premium cable” market is full of snake oil. You do not need $80 gold-plated oxygen-free copper boutique cables to get professional results. But you also shouldn’t buy the cheapest cables you can find on a random marketplace listing.
Here’s what actually matters in cable quality:
- Connectors: Neutrik connectors are the industry standard for a reason. They’re built to withstand thousands of insertions and have solid strain relief. Rean (Neutrik’s budget line) is also perfectly fine for home studios.
- Shielding: Look for braided or combination shielding (braided + foil). Cheap cables often use spiral shielding, which can develop gaps when the cable is bent repeatedly.
- Wire gauge: For instrument cables, 20 AWG is standard. For speaker cables (not the same as instrument cables!), 16 or 14 AWG is preferred for longer runs.
- Flexibility: A cable that’s too stiff will develop internal breaks at the connector junction. Good cables remain flexible even in cold environments.
Brands I trust and use: Mogami, Canare, and Hosa cover everything from budget to professional. Mogami Gold is the studio standard for critical paths (microphones, monitor connections). Hosa Pro is excellent value for general studio wiring. Canare is what you’ll find in most broadcast studios worldwide.
Common Mistakes That Ruin Your Audio
After building and maintaining studios for nearly three decades, these are the mistakes I see over and over:
- Using TS cables for monitor connections. Your monitors have balanced inputs for a reason. Using a TS cable throws away 6 dB of noise rejection and introduces potential ground loops. Use TRS or XLR.
- Running unbalanced cables parallel to power cables. AC power cables radiate electromagnetic fields at 60 Hz (50 Hz in some countries). An unbalanced audio cable running alongside a power cable will pick up that hum. Cross power cables at 90-degree angles and keep them separated by at least 12 inches.
- Using instrument cables as speaker cables. Instrument cables (shielded, thin gauge) are NOT speaker cables. Speaker cables need thicker wire (lower gauge) to handle the higher current from amplifiers. Using instrument cables for speakers can damage your equipment and sounds terrible.
- Ignoring cable management. Tangled cables create crosstalk, make troubleshooting impossible, and eventually develop internal breaks from stress. Velcro ties, cable trays, and labeled connections save hours of frustration.
- Plugging TRS into TS jacks (and vice versa). A TRS cable plugged into a TS jack will usually work but may short the ring to the sleeve, causing signal loss or distortion. Know your connectors and match them correctly.
Quick Reference: Audio Cable Guide XLR TRS TS at a Glance
Here’s your cheat sheet. Bookmark this section for quick reference when you’re wiring up your studio:
- XLR: Balanced, 3-pin, locking. Use for microphones, long cable runs, live sound, professional studio connections. Can run 200+ feet without noise.
- TRS (1/4″): Balanced mono or stereo unbalanced, 3-conductor. Use for studio monitors, headphones, insert cables, balanced outboard gear connections.
- TS (1/4″): Unbalanced, 2-conductor. Use for electric guitar, bass, synths, short cable runs under 15–20 feet.
The golden rule: use balanced cables wherever possible, especially for runs over 6 feet. When gear only supports unbalanced connections, keep cables short and away from power sources. And when in doubt, XLR is almost never the wrong choice.
I’ve seen too many producers spend thousands on microphones, preamps, and plugins while completely overlooking the cables connecting it all. The truth is, a $200 microphone through the right cables will outperform a $2,000 microphone through the wrong ones every single time. Get your cabling right, and everything else in your signal chain gets to do its job properly.
Whether you’re building a home studio from scratch or upgrading your cable infrastructure, getting the signal path right is the foundation of great sound.
Get weekly AI, music, and tech trends delivered to your inbox.