
Vercel AI SDK 5 Deep Dive: Streaming Tool Calls, RSC Migration, and the New Agentic Architecture
August 29, 2025
Framework Laptop 13 AMD Review: Modular Repairability Meets Ryzen AI Power in 2025
August 29, 2025
I’ve been recording acoustic guitars for over 28 years, and here’s the uncomfortable truth: most home recordings sound flat, boxy, or weirdly thin — and the fix almost always comes down to acoustic guitar microphone placement, not better gear. Move it two inches and everything changes.
Acoustic guitar is one of the most deceptively difficult instruments to capture well. The sound radiates from the soundhole, the top, the back, and even the neck — all at different frequencies and volumes. Point a mic at the wrong spot, and you’ll spend hours trying to fix in the mix what should have been right at the source.
In this guide, I’ll walk you through 7 acoustic guitar microphone placement techniques that I use regularly in sessions — from the simplest single-mic setup to advanced stereo configurations. Each one serves a specific purpose, and knowing when to reach for which technique will transform your recordings.
Before You Place the Mic: The Fundamentals
Before we dive into specific positions, there are three rules that apply to every acoustic guitar microphone placement technique:
- Never point directly at the soundhole. That air resonance around 100Hz will overwhelm everything else. As Sound On Sound’s engineers have noted, the soundhole acts like “a fire hose for sound waves” — all detail gets washed out by booming low frequencies.
- New strings matter. Change strings the night before recording. Fresh strings have the brightness and sustain you need; dead strings sound muddy no matter where you place the mic.
- The room is your second instrument. A small, reflective room with standing waves in the low-mid range (right where acoustic guitar lives) will sabotage even perfect mic placement. If your room isn’t treated, get closer to the guitar and use a cardioid pattern to reject room reflections.
1. The 12th-Fret Sweet Spot (Single Mic)
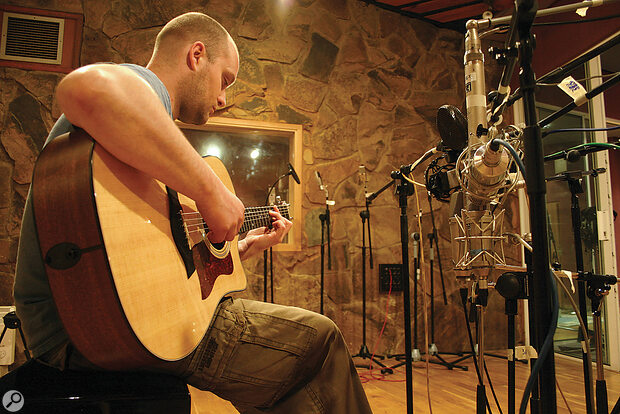
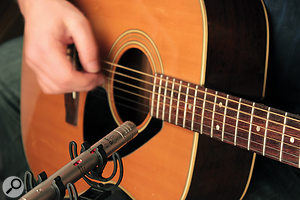
This is the most universally reliable acoustic guitar microphone placement, and it’s where every session should start. Position a small-diaphragm condenser about 15–20 cm (6–8 inches) from the guitar, aimed at where the neck meets the body — roughly the 12th fret area.
Why does this work so well? At the 12th fret, you’re capturing a natural balance between the body’s low-end warmth and the strings’ high-end detail. You avoid the bass boom of the soundhole and the excessive brightness of the bridge area. Engineers like Al Schmitt and Jim Scott have used variations of this position for decades.
Best for: Singer-songwriter recordings where the guitar supports vocals, quick demo sessions, situations where you only have one mic available.
Mic recommendation: Neumann KM 184, Shure SM81, or on a budget, the Audio-Technica AT2021. Any quality small-diaphragm condenser works beautifully here.
2. The Bridge-Side Position (Warmer Tone)
When the 12th-fret position sounds too bright — common with brand-new steel strings or aggressive flatpicking — shift the mic toward the bridge side. Position it about 20 cm from the lower bout, angled slightly toward the bridge.
This position captures more of the guitar’s body resonance and reduces pick noise and string squeak. The trade-off is less string definition, which makes it ideal for rhythm parts that need to sit behind vocals without competing for high-frequency space.
Best for: Rhythm guitar parts, fingerstyle with a warm tone, nylon-string classical guitar, reducing pick noise in dense mixes.
3. The Over-the-Shoulder Position (Player’s Perspective)
Here’s a technique I picked up from a session with a Nashville engineer years ago: place the mic behind the guitarist’s right shoulder (for a right-handed player), about 30–40 cm from the guitar, pointing down toward the soundhole area from above.
This captures what the player actually hears — a balanced blend of body, strings, and room. It’s surprisingly natural-sounding and avoids many of the proximity-effect issues that plague close-mic setups. The downside is more room sound, so this works best in a good-sounding space.
Best for: Live-feeling recordings, singer-songwriters who move while playing, capturing a natural “in the room” tone.
4. XY Stereo (Coincident Pair)
XY is the easiest and most reliable stereo acoustic guitar microphone placement technique. Take two matched small-diaphragm condensers, angle their capsules at 90° to each other with the diaphragms as close together as possible, and point the pair at the neck-body junction from about 30 cm away.
The beauty of XY is its mono compatibility. Because the capsules are nearly coincident, there are virtually no phase issues — the stereo image collapses to mono cleanly. Universal Audio’s recording guide recommends this as the go-to stereo technique for acoustic guitar, and I agree for most situations.
Best for: Solo acoustic guitar performances, recordings that may be summed to mono (broadcast, phone playback), tight mixes where you need controlled stereo width.
Mic recommendation: A matched pair of Neumann KM 184s, AKG C451 Bs, or Rode NT5s for budget setups.
5. Spaced Pair (AB Stereo)
The spaced pair technique places one mic near the 12th fret and another near the bridge, each about 15–20 cm from the guitar. This creates a wide, immersive stereo image that makes the acoustic guitar sound larger than life.
The critical rule here is the 3:1 ratio: the distance between the two mics should be at least three times the distance from each mic to the guitar. If each mic is 15 cm from the guitar, the mics should be at least 45 cm apart. This minimizes comb filtering and phase cancellation.
Unlike XY, spaced pair doesn’t collapse to mono as cleanly — but in a dedicated acoustic guitar feature or instrumental album, that wide stereo spread is exactly what you want.
Best for: Solo guitar albums, acoustic instrumentals, any mix where the guitar is the primary focus and stereo playback is guaranteed.
6. Mid-Side (M/S) Stereo
Mid-side is the secret weapon for acoustic guitar recording, and it’s criminally underused in home studios. The setup: one cardioid mic (the “mid”) pointing directly at the guitar, and one figure-8 mic (the “side”) placed at the same position but facing sideways, perpendicular to the guitar.
The magic of M/S is adjustable stereo width after recording. Decode the M/S signal in your DAW, and you can widen or narrow the stereo image without any phase issues. Need a wide, spacious guitar for the intro? Crank the side channel. Need it tighter for the chorus when the band kicks in? Pull the side back.
I use M/S frequently when I’m not sure how wide the guitar needs to be in the final mix. It gives you options that no other technique provides.
Best for: Sessions where the arrangement isn’t final, film/TV scoring, any project where you want maximum flexibility in the mix.
Mic recommendation: AKG C414 (switchable to figure-8) paired with a Neumann KM 184, or the Shure SM81 as the mid mic with a ribbon like the Royer R-121 for the side channel.
7. The Omni Room Blend (Advanced)
When you have access to a great-sounding room — treated live room, wooden-floor studio, or even a resonant hallway — add an omnidirectional mic 1–2 meters from the guitar as a room capture, blended with your close mic.
Omnidirectional mics have no proximity effect, which means no bass buildup at close range and a more natural, open sound. As Sound On Sound’s engineering articles have documented, some legendary engineers like Steve Albini preferred working at 2–3 feet with omni or figure-8 patterns, letting the room do the heavy lifting.
Blend the close mic for detail and the omni for depth and space. In my experience, even a 10–15% blend of the room mic adds a three-dimensional quality that EQ and reverb plugins can never replicate.
Best for: Acoustic albums, sessions in exceptional rooms, adding depth to close-mic recordings that sound too “direct.”
Common Acoustic Guitar Microphone Placement Mistakes
After thousands of acoustic guitar sessions, these are the mistakes I see most often:
- Mic too close to the soundhole: Creates an unusable bass-heavy, boomy sound. Even 5 cm toward the neck makes a dramatic improvement.
- Ignoring phase between multiple mics: If two mics sound worse together than either one alone, flip the polarity on one. If that doesn’t fix it, adjust the distance until the comb filtering disappears.
- Not checking mono compatibility: Always collapse your stereo guitar to mono and listen. If it sounds hollow or thin, you have phase problems.
- Forgetting the guitarist moves: Mark the chair position with tape. Even experienced players shift forward and back between verses and choruses, changing the mic-to-source distance mid-take.
- Using only one technique: Record the same performance with two different placements if you have the channels. Having options in the mix saves sessions.
Which Technique Should You Use?
Here’s my quick decision framework after 28 years of recording acoustic guitars:
- One mic, need it fast: 12th-fret sweet spot (Technique 1)
- Guitar behind vocals: Bridge-side position (Technique 2)
- Natural, live feel: Over-the-shoulder (Technique 3)
- Safe stereo, mono-compatible: XY (Technique 4)
- Wide, cinematic stereo: Spaced pair (Technique 5)
- Maximum mix flexibility: Mid-side (Technique 6)
- Best room, best result: Omni room blend (Technique 7)
The single most important thing I can tell you about acoustic guitar microphone placement is this: use your ears before you use your eyes. Put on headphones, close one ear, and walk around the guitar while someone plays. The spot where it sounds best to your ear is almost always where the mic should go. Pierre Marchand and Mike Clink — both legendary producers — have said exactly this, and after decades in the studio, I can confirm it’s the most reliable method there is.
Start with Technique 1, get comfortable with it, and then experiment outward. Every guitar and every room is different, but these seven positions give you a vocabulary that covers virtually any recording scenario you’ll encounter.
Need help dialing in your acoustic guitar recordings or studio workflow? With 28+ years in music production, I can help you get studio-quality results.
Get weekly AI, music, and tech trends delivered to your inbox.


