Cloudflare AI Gateway: How I Cut LLM API Costs by 90% With One Line of Code
October 20, 2025
Corsair K100 Air Wireless Keyboard: Ultra-Thin Mechanical for Productivity
October 20, 2025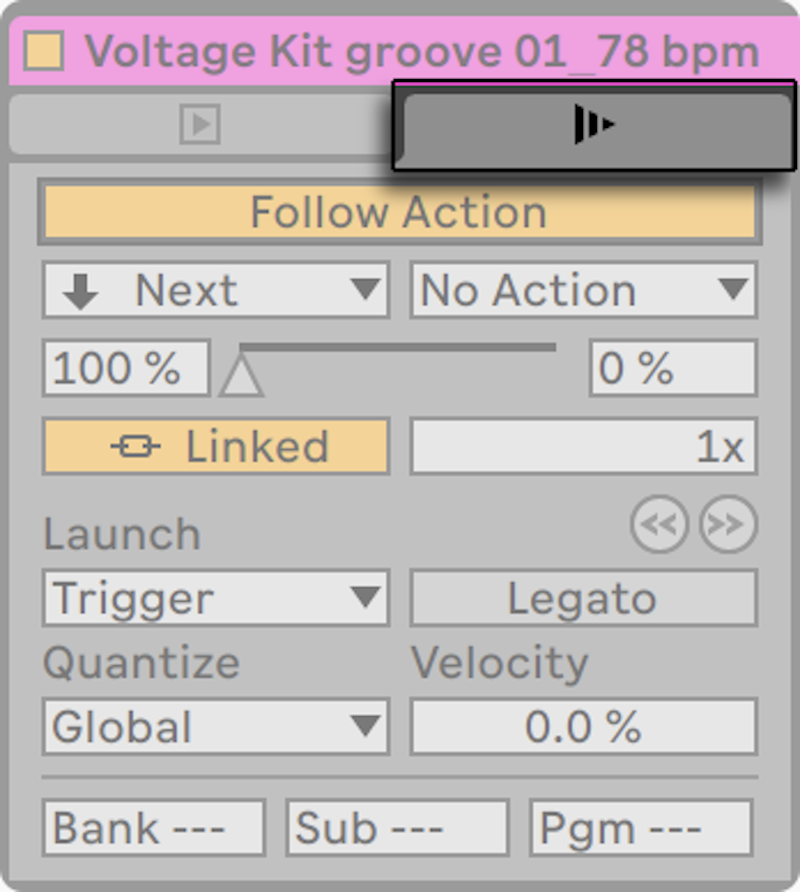
After 28 years of making music, I thought I’d seen every trick in the book — then Ableton Live 12 clip launching completely rewired how I approach live electronic music sets. Last month, I ran a 20-minute generative techno performance using nothing but Follow Actions and probability settings. No manual triggers, no pre-arranged timeline. Just clips making decisions on their own. Here’s exactly how to get there.
The 4 Launch Modes in Ableton Live 12 Clip Launching: Beyond the Basics
Every clip in Session View has a Launch Mode setting that fundamentally changes how it responds to your input. Most producers stick with Trigger mode and never look back. That’s leaving serious performance potential on the table. Let’s break down all four modes and when each one becomes essential.
Trigger Mode — Your Reliable Workhorse
Trigger is the default: click (or send a MIDI note-on) and the clip plays until you stop it or launch another clip in the same track. The key detail most people miss is how Trigger interacts with Launch Quantization. Set it to 1 Bar and every transition snaps to the downbeat — your audience will never hear a timing glitch. Set it to None and you get instant, raw transitions that work beautifully for ambient and sound design sessions.
Gate Mode — The Live Performance Secret Weapon
Gate mode plays the clip only while you hold the button. Release it and playback stops immediately. This is transformative for drum fills, FX risers, and vocal stabs. On Push 3, each pad becomes a pressure-sensitive instrument — hold a pad for a two-beat fill, release, and your main pattern resumes without you touching anything else. For electronic music performers, Gate mode bridges the gap between DJing and live instrumental performance.
Toggle Mode — Layer Builder
First click starts playback, second click stops it. Toggle transforms your Session View into a layered loop station. Set your kick track, bass track, hi-hat track, and synth pad each to Toggle mode, and you can build up and tear down arrangements in real time — adding elements one by one like a DJ bringing up channel faders.
Repeat Mode — Instant Glitch and Stutter
Repeat continuously re-triggers the clip’s start point at the Launch Quantization interval. Set quantization to 1/16 and you get a machine-gun stutter effect. At 1/8, it’s a rhythmic pulse. This is incredibly effective for IDM, experimental electronic music, and those dramatic build-up moments before a drop. Combine Repeat mode with automation on a filter cutoff and you’ve got a performance tool that rivals dedicated stutter plugins.

Follow Actions: The Engine Behind Generative Electronic Music
Follow Actions are where Ableton Live 12 clip launching goes from “useful” to “mind-blowing.” After a clip finishes playing (or after a time interval you define), Follow Actions automatically trigger the next event — and Live 12 gives you 10 preset actions with a full probability system. The Ableton official reference manual covers the fundamentals, but the real power is in how you combine them.
Probability-Based Follow Actions for Generative Compositions
The breakthrough feature is the probability system. Instead of a linear, predictable sequence, you can assign weighted chances to different outcomes. Here’s a practical setup I use for techno sets:
- Action A: “Next” — 60% probability (maintains forward momentum)
- Action B: “Any” — 30% probability (introduces controlled randomness)
- Action C: “Jump” to a specific clip — 10% probability (creates recurring themes)
With four drum pattern clips configured this way, you get a set that mostly progresses forward but occasionally throws in unexpected variations. Every time you hit play, the arrangement is different. Sound On Sound’s creative clip launching guide calls this “the most accessible entry point to generative composition” — and I completely agree.
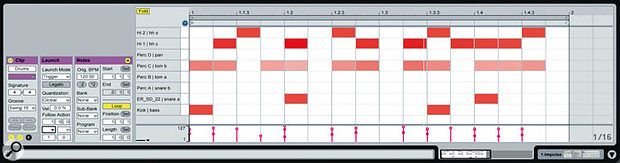
Practical Setup: Drum Pattern Chaining
Here’s the exact configuration I use in live techno sets. Four clips in a single drum track:
- Clip 1 (Main kick pattern): Follow Action → “Next” after 4 bars, 100% probability
- Clip 2 (Hi-hat variation): Follow Action → “Previous” after 2 bars at 70%, “Next” at 30%
- Clip 3 (Fill pattern): Follow Action → “First” after 1 bar, 100% probability
- Clip 4 (Breakdown): Follow Action → “Next” after 8 bars, 100% probability
The result: Main pattern → variation → main (or fill) → breakdown, all flowing automatically. Clip 3 acts as a one-bar drum fill that immediately snaps back to the top. Clip 2’s 70/30 split means sometimes you get a call-and-response between clips 1 and 2 before moving forward. It sounds organic, it sounds intentional, and it requires zero manual intervention once you launch the first clip.
Legato Mode and Launch Quantization: Seamless Transitions
Legato Mode is the unsung hero of professional clip launching. When enabled, a newly launched clip picks up playback from the position of the previously playing clip rather than starting from the beginning. If the outgoing clip was at bar 3, the incoming clip starts at bar 3.
Legato + Breakbeats: A Killer Combination
Create multiple versions of the same-length breakbeat loop — original, reversed, half-time, glitched — and enable Legato Mode on all of them. Now switch between versions at any moment and the transition is perfectly seamless because playback position is preserved. You’re essentially performing a real-time remix without any timing risk. This technique alone has transformed how I handle drum programming in live sets.
Strategic Launch Quantization Settings
Launch Quantization determines when a triggered clip actually begins playing. You can set it globally, but the real power is in per-clip settings that override the global value:
- 1 Bar: Best for most musical elements. Guarantees clean, on-beat transitions
- 1/4 (Quarter note): Ideal for vocal chops and melodic layer swaps mid-bar
- 1/8 or 1/16: Glitch and stutter territory. Pair with Repeat mode for extreme effects
- None: Instant, unquantized launch. Perfect for ambient, drone, and sound design sessions
Pro tip: set drums to 1 Bar, synth pads to 1/4, and FX layers to None. Each element gets the transition timing that matches its musical role, and the overall set feels both tight and fluid.
Scene Follow Actions: Automating Your Entire Live Set
Clip-level Follow Actions are powerful, but Scene Follow Actions in Live 12.1 take automation to the arrangement level. Instead of individual clips deciding what happens next, entire scenes — with all their tracks playing simultaneously — transition automatically. Recording Magazine’s Live 12.1 review highlighted this as one of the most significant workflow improvements in the update.
Here’s a complete live set structure using Scene Follow Actions:
- Scene 1 — Intro (16 bars): Ambient pad + sub bass. Follow Action → Next at 100%
- Scene 2 — Build (8 bars): Add hi-hats + filter automation. Follow Action → Next at 100%
- Scene 3 — Drop (32 bars): Full kick + bassline + lead synth. Follow Action → Next at 80%, Any at 20%
- Scene 4 — Breakdown (16 bars): Remove kick + reverb tail. Follow Action → Next at 100%
- Scene 5 — Build 2 (8 bars): Riser + snare roll. Follow Action → Jump to Scene 3 at 100%
The 20% “Any” probability on Scene 3 is the secret sauce. Most of the time, the set progresses linearly. But occasionally, a random scene jump creates an unexpected moment that keeps both you and your audience engaged. Scene 5 loops back to Scene 3, creating an infinite performance loop that evolves every cycle.
Velocity Control and Advanced MIDI Mapping
One often-overlooked feature is velocity sensitivity in clip launching. In the Launch tab, setting the Velocity parameter between 0 and 127 means harder hits on your MIDI controller pads produce louder playback. This adds a human, dynamic quality to electronic performances that’s impossible with mouse clicks.
Isotonik Studios’ comprehensive clip launching guide covers an advanced technique worth noting: using MIDI mapping to control multiple clips’ Launch Quantization values with a single knob. In a live setting, being able to shift your entire drum rack from tight 1-bar transitions to glitchy 1/16 stutters with one knob turn is a dramatic performance tool.
Push 3 Integration
If you’re using Ableton Push 3, clip launching reaches another dimension entirely. Standalone mode gives you full Session View control from the pads — every clip is one tap away. With the enhanced Follow Actions interface added in Live 12.1, you can adjust probability settings directly on Push without ever looking at a computer screen. For stage performers, this means your entire generative set runs from a single piece of hardware.
Ableton Live 12 clip launching isn’t just a “play button” — it’s a complete performance system. When you combine Launch Modes, Follow Actions, Legato Mode, and Scene Automation, you create a living, breathing set that generates different results every time. The best way to start is small: four drum clips with Follow Actions. Build from there, add probability, layer in Legato transitions, and before you know it, you’ll have a unique live set that no one else can replicate — because it’s different every single time you perform it.
Need help building your live performance rig or dialing in a professional mix? Sean Kim brings 28+ years of music production and audio engineering experience to every project.
Get weekly AI, music, and tech trends delivered to your inbox.


