
AI Video Generation Comparison June 2025: Sora vs Runway Gen-4 vs Kling 2.1 vs Pika 2.2
June 18, 2025
Samsung Galaxy Ring Review: $399 Smart Health Ring Setup Guide After 11 Months of Daily Wear
June 18, 2025
I spent my first three years mixing in an untreated bedroom — and every single mix translated terribly to other systems. The day I hung four DIY panels made from $25 worth of Rockwool, everything changed. If your home studio acoustic treatment DIY project has been sitting on a “someday” list, this guide will show you exactly how to build professional-grade panels and bass traps for under $500.
Why Acoustic Treatment Matters More Than Any Plugin
Here’s the uncomfortable truth: no amount of Sonarworks calibration or expensive monitor upgrades will fix a room with 400ms of flutter echo and 12dB of bass buildup in the corners. Your room is the first and most important link in your monitoring chain. According to Sound On Sound’s acoustic treatment guide, untreated rooms introduce comb filtering, standing waves, and excessive decay that literally prevent you from hearing what you’re mixing.
The good news? You don’t need to spend thousands. A strategic home studio acoustic treatment DIY approach targeting the right surfaces can transform your room for less than the cost of a single premium plugin bundle.

Understanding Your Room’s Problems: The Basics
Before you buy a single piece of insulation, you need to understand what’s actually happening in your room. Three acoustic phenomena are ruining your mixes right now:
1. First Reflections (The Mix Killers)
Sound from your monitors hits the side walls, ceiling, and desk before reaching your ears — arriving milliseconds after the direct signal. This creates comb filtering that smears your stereo image and makes EQ decisions unreliable. Finding these reflection points is simple: sit in your mix position and have a friend slide a mirror along the walls. Wherever you can see a monitor’s tweeter in the mirror — that’s a first reflection point that needs treatment.
2. Bass Buildup (The Invisible Problem)
Low frequencies accumulate in room corners and along wall-to-wall junctions, creating “room modes” — frequencies that are dramatically louder or quieter depending on where you sit. This is why your bass sounds perfect at the mix position but disappears two feet away. The Sonarworks engineering team emphasizes the SBIR (Speaker Boundary Interference Response) formula: fc = c/(4d), where placing monitors 1-2 meters from walls creates severe cancellation notches in the critical bass range.
3. Flutter Echo (The Obvious One)
Clap your hands in your room. Hear that metallic ringing? That’s flutter echo bouncing between parallel surfaces. It’s the easiest problem to identify and, fortunately, the easiest to fix with even basic absorption.
The $0 Tier: Free Fixes You Should Do Right Now
Before spending a dime, optimize what you already have. These free adjustments can improve your monitoring accuracy by 30-40%:
- Speaker placement: Position monitors in an equilateral triangle with your head. Keep them at least 1 foot from walls, with tweeters at ear height.
- Desk position: Center your desk along the shorter wall, with its sides parallel to the longer walls. Never place your mix position exactly at the room’s halfway point — that’s a bass null zone.
- Furniture as treatment: Bookshelves filled unevenly with books scatter high-frequency reflections (free diffusion). A couch or thick rug absorbs mid-range energy. Heavy curtains on windows reduce flutter echo.
- Symmetry: Make sure both sides of your listening position are as similar as possible — same distance to walls, same furniture arrangement.
The Under-$200 Tier: Your First DIY Panels
This is where the real transformation begins. With 4-6 DIY absorption panels, you’ll eliminate first reflections and dramatically tighten your stereo image.
Materials List (Per 2’×4′ Panel)
- Insulation: Rockwool Safe’n’Sound or Owens Corning 703 — one 24″×48″ slab, 2″ thick ($8-12)
- Frame: 1×4 select pine or furring strips ($6-8)
- Fabric: Breathable acoustic fabric or burlap ($4-6 per panel — Guilford of Maine is the gold standard, but burlap from a craft store works fine)
- Hardware: Wood screws, L-brackets, staples, French cleats for mounting ($3-5)
- Total per panel: $25-30 (vs. $80-150 for commercial equivalents)
That’s a 50-70% savings over commercial panels like GIK 242s or Auralex ProPanels — with identical acoustic performance.
Rockwool vs. OC-703: Which Should You Choose?
Rockwool (mineral wool) is the budget champion. It’s cheaper, doesn’t irritate skin like fiberglass, and actually has slightly better absorption characteristics. The downside: it’s less rigid, so it can sag in frames if not supported properly. OC-703 (fiberglass) is more rigid and easier to frame, but costs more and requires gloves and a mask during handling. For most DIY builders, Rockwool Safe’n’Sound is the better choice — it’s widely available at Home Depot and Lowe’s, and the price difference adds up fast when you’re building 8-10 panels. Aim for a minimum density of 3 pounds per cubic foot (PCF) regardless of material.
Step-by-Step Build Process
- Step 1: Cut your 1×4 lumber to create a frame: two 48″ pieces and two 22.5″ pieces (accounting for the 0.75″ board thickness). Join with wood screws and L-brackets at corners.
- Step 2: Insert the insulation slab into the frame. It should fit snugly. If using Rockwool, you may need to compress slightly.
- Step 3: Lay your fabric face-down on a flat surface. Place the panel insulation-side down on the fabric. Pull fabric taut — like stretching a canvas — and staple to the back of the frame, starting from the center of each side and working outward.
- Step 4: Fold corners neatly (hospital corner style) and staple flat. Trim excess fabric.
- Step 5: Mount a French cleat on the back for easy, secure wall hanging. Leave a 2-4″ air gap between the panel and wall — this dramatically improves low-frequency absorption.
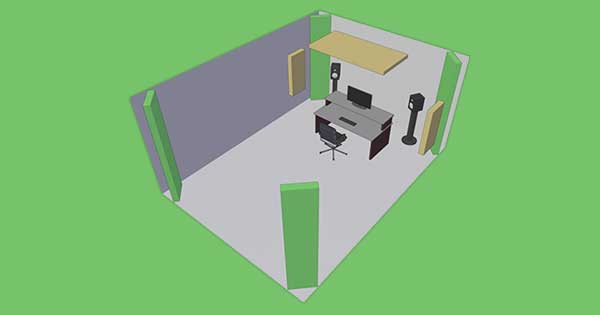
Placement Priority for 4-6 Panels
- Panels 1-2: Left and right side walls at first reflection points (use the mirror trick)
- Panels 3-4: Ceiling reflection point directly above the mix position (a “cloud” panel)
- Panels 5-6: Behind the monitors, on the front wall
The Under-$500 Tier: Full Room Treatment
This is where your room starts behaving like a professional mixing environment. You’re adding bass traps and completing your absorption coverage.
DIY Bass Traps: The Biggest Bang for Your Buck
Corner bass traps should be your single highest priority after first reflection panels. Bass builds up in corners more than anywhere else, and thick absorption in these locations tames room modes that no plugin can fix.
For DIY bass traps, use 4-6″ thick insulation (double up your 2″ Rockwool slabs) in triangular or rectangular frames that straddle room corners. Floor-to-ceiling coverage is ideal. Four corner traps using doubled Rockwool will cost approximately $80-120 in materials and absorb frequencies from roughly 125Hz and up — the critical range where most bedroom studios have the worst problems.
Complete $500 Budget Breakdown
- 8-10 absorption panels (2″ thick): $200-250
- 4 corner bass traps (4-6″ thick): $80-120
- 1 ceiling cloud (2-4″ thick): $40-60
- Mounting hardware (French cleats, eye hooks, chain): $30-40
- Tools (if needed — saw, drill, staple gun): $50-80
- Total: $400-550
Pro tip from Splice’s DIY guide: buy insulation in bulk and split the cost with other producers. A single Rockwool batt comes in packs of 6-12 slabs, which is enough for multiple panels.
5 Common Home Studio Acoustic Treatment DIY Mistakes
After treating dozens of rooms over 28 years in the audio industry, I’ve seen these mistakes repeatedly:
- Mistake #1: Foam-only treatment. Those $30 Amazon foam wedge kits absorb some high-frequency flutter echo — and absolutely nothing below 500Hz. They create an unbalanced room that sounds “dead” in the highs but boomy in the bass. Real treatment requires dense mineral wool or fiberglass, not open-cell foam.
- Mistake #2: Over-absorption. Covering every wall surface makes your room sound unnaturally dead and fatiguing to work in. You need a balance of absorption and either bare surfaces or diffusion. Treat approximately 30-40% of your wall surface area — not 100%.
- Mistake #3: Ignoring the ceiling. The ceiling is just as reflective as your walls. A single cloud panel above your mix position makes a dramatic difference in imaging clarity.
- Mistake #4: Confusing soundproofing with treatment. Acoustic treatment controls sound inside your room. Soundproofing prevents sound from entering or leaving. They require completely different approaches. Egg cartons and moving blankets do almost nothing for either.
- Mistake #5: Asymmetric treatment. If your left wall has two panels and your right wall has zero, your stereo image will be skewed. Always treat symmetrically relative to your mix position.
Measuring Your Results
Don’t just trust your ears — measure. Free tools like Room EQ Wizard (REW) with an inexpensive measurement microphone (the Behringer ECM8000 or Dayton Audio EMM-6 costs under $40) will show you exactly what’s happening in your room. Measure before and after treatment to see real improvement.
Target metrics to aim for: RT60 (reverb time) under 0.4 seconds for a small room, and a noise floor meeting NC-20/NR-20 criteria at your listening position. Even a smartphone app with an octave-band analyzer can give you a rough baseline.
When to Consider Going Beyond DIY
DIY treatment handles 80-90% of typical home studio problems. But if you’ve treated your room and still have issues — particularly below 80Hz or with specific room modes that won’t go away — commercial solutions like GIK Acoustics membrane bass traps or tuned Helmholtz resonators may be worth the investment. GIK also offers a free room analysis service where you submit photos and dimensions, and they recommend a treatment plan.
Software calibration tools like Sonarworks SoundID Reference can complement your physical treatment by correcting remaining frequency response issues — but remember, calibration should always come after treatment, never as a replacement for it.
The bottom line? A $500 DIY treatment job in a dedicated room will outperform a $5,000 monitoring setup in an untreated space every single time. Your room is the foundation. Treat it right, and every mix decision you make from that chair becomes more accurate, more translatable, and more professional.
Need help designing your studio’s acoustic treatment plan or optimizing your mixing environment? Sean Kim brings 28+ years of professional audio experience to every consultation.
Get weekly AI, music, and tech trends delivered to your inbox.


